Building a side-kick display for your PC with .NET 5

Sidekick

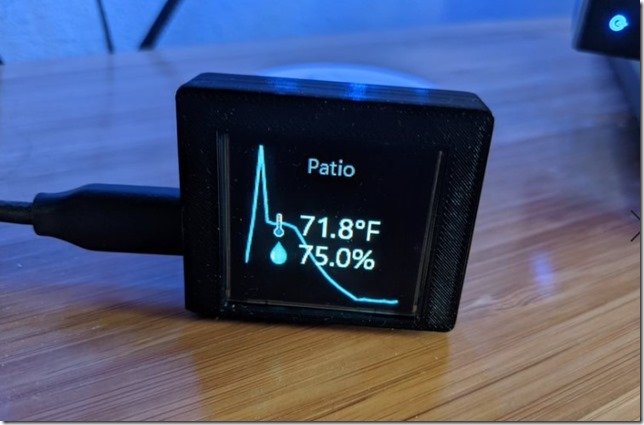
I used to have a little 8" tablet next to my PC that would run a little simple app, and show calendar for today, weather and various other info. It was a neat little thing to have to glance at, and I rarely missed a meeting etc. because I would often glance and get reminded of what's on my to-do list today. However tablets don't like to be plugged in 24/7, so ultimately it died, and I've been missing having something like this for a while.

That's where I got the idea to just plug in a little external display to my PC and have a little app run on that. However, when you plug in another display, it becomes part of your desktop, and I didn't want it to be an area where other apps could go to, or where the app that is meant to launch on it, would go somewhere else, which got me wondering: Can I plug in one of those little IoT displays I had laying around into my PC and drive it with a little bit of code?
oled

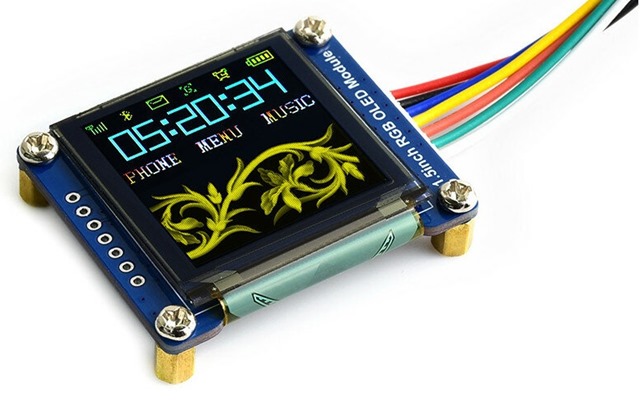
These little 1.5" OLED displays are great, and could do the job. The only problem was, this was an SPI display, and my PC doesn't have an SPI port. A bit of searching and I found Adafruit has an FT232H USB-to-SPI board that can do the trick. A quick bit of soldering, and you're good to go (see diagram wiring below): If you want to create a 3D printed case for it, you can download my models from here: https://www.thingiverse.com/thing:4935630 (it's a tight fit so keep those wires short and tight)
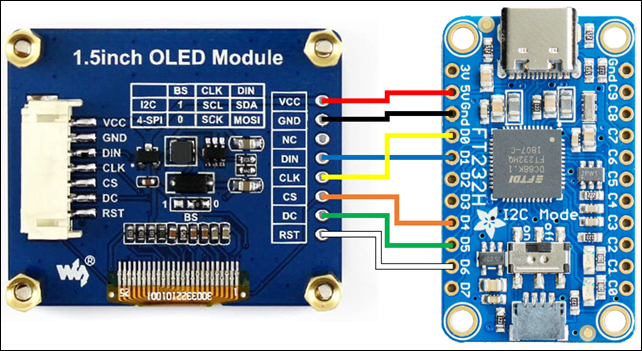
ConnectionDiagram

Now I wanted to use .NET IoT since this was the easiest for me to write against, but unfortunately it turned out this specific Adafruit SPI device isn't supported. However the IoT team is awesome, and after reaching out, they couldn't help themselves adding this support (Thank you Laurent Ellerbach who did this on his vacation!). The display module is already supported by .NET IoT, so it was mostly a matter of figuring out what code to write to hook it up correctly. Luckily there are samples there that only needed slight tweaking. So let's get to the code.

Setting up the project

First open a command prompt / terminal, and start by creating the application worker process and add some dependencies we need:

> dotnet new worker
> dotnet add package Iot.Device.Bindings
> dotnet add package Microsoft.Extensions.Hosting.WindowsServices

You'll also want to change the target framework to 'net5.0-windows10.0.19041.0' since we'll be using the Windows APIs further down.

At the time of writing this, the FT232H PR hasn't been merged yet, so download that project from here and add it as a project reference. Hopefully by the time you read this, it'll already be part of the bindings package.

Initializing the display

The thing we'll do is to create the display driver that we need, so let's add a method for that to the Worker.cs file:

private static Iot.Device.Ssd1351.Ssd1351 CreateDisplay()
{
    var devices = Iot.Device.Ft232H.Ft232HDevice.GetFt232H();
    var device = new Iot.Device.Ft232H.Ft232HDevice(devices[0]);
    var driver = device.CreateGpioDriver();            
    var ftSpi = device.CreateSpiDevice(new System.Device.Spi.SpiConnectionSettings(0, 4) { Mode = System.Device.Spi.SpiMode.Mode3, DataBitLength = 8, ClockFrequency = 16_000_000 /* 16MHz */ });
    var controller = new System.Device.Gpio.GpioController(System.Device.Gpio.PinNumberingScheme.Logical, driver);
    Iot.Device.Ssd1351.Ssd1351 display = new(ftSpi, dataCommandPin: 5, resetPin: 6, gpioController: controller);
    return display;
}


Next we need to set a range of commands to the display to get it configured and "ready". We'll add another method for that here:

private static async Task InitDisplayAsync(Iot.Device.Ssd1351.Ssd1351 display)
{
    await display.ResetDisplayAsync();
    display.Unlock();
    display.MakeAccessible(); // Command A2,B1,B3,BB,BE,C1 accessible if in unlock state
    display.SetDisplayOff(); // Turn on sleep mode
    display.SetDisplayEnhancement(true);
    display.SetDisplayClockDivideRatioOscillatorFrequency(0x00, 0x0F); // 7:4 = Oscillator Frequency, 3:0 = CLK Div Ratio (A[3:0]+1 = 1..16)
    display.SetMultiplexRatio(); // Use all 128 common lines by default....
    display.SetSegmentReMapColorDepth(Iot.Device.Ssd1351.ColorDepth.ColourDepth262K, 
        Iot.Device.Ssd1351.CommonSplit.OddEven, Iot.Device.Ssd1351.Seg0Common.Column0,
        Iot.Device.Ssd1351.ColorSequence.RGB); // 0x74 Color Depth = 64K, Enable COM Split Odd Even, Scan from COM[N-1] to COM0. Where N is the Multiplex ratio., Color sequence is normal: B -> G -> R
    display.SetColumnAddress(); // Columns = 0 -> 127
    display.SetRowAddress(); // Rows = 0 -> 127
    display.SetDisplayStartLine(); // set startline to to 0
    display.SetDisplayOffset(0); // Set vertical scroll by Row to 0-127.
    display.SetGpio(Iot.Device.Ssd1351.GpioMode.Disabled, Iot.Device.Ssd1351.GpioMode.Disabled); // Set all GPIO to Input disabled
    display.SetVDDSource(); // Enable internal VDD regulator
    display.SetPreChargePeriods(2, 3); // Phase 1 period of 5 DCLKS,  Phase 2 period of 3 DCLKS
    display.SetPreChargeVoltageLevel(31);
    display.SetVcomhDeselectLevel(); // 0.82 x VCC
    display.SetNormalDisplay(); // Reset to Normal Display
    display.SetContrastABC(0xC8, 0x80, 0xC8); // Contrast A = 200, B = 128, C = 200
    display.SetMasterContrast(0x0a); // No Change = 15
    display.SetVSL(); // External VSL
    display.Set3rdPreChargePeriod(0x01); // Set Second Pre-charge Period = 1 DCLKS
    display.SetDisplayOn(); //--turn on oled panel
    display.ClearScreen();
}

This should be enough to start using our panel. Let's modify the ExecuteAsync method to initialize the display and have it start drawing something:

Iot.Device.Ssd1351.Ssd1351? display;

protected override async Task ExecuteAsync(CancellationToken stoppingToken)
{
    display = CreateDisplay();
    await InitDisplayAsync(display);
    try
    {
        while (!stoppingToken.IsCancellationRequested)
        {
            display.FillRect(System.Drawing.Color.Red, 0, 0, 128, 128);
            await Task.Delay(1000, stoppingToken);
            display.FillRect(System.Drawing.Color.White, 0, 0, 128, 128);
            await Task.Delay(1000, stoppingToken);
        }
    }
    catch (OperationCanceledException)
    {
    }
    finally
    {
        display.SetDisplayOff();
    }
}

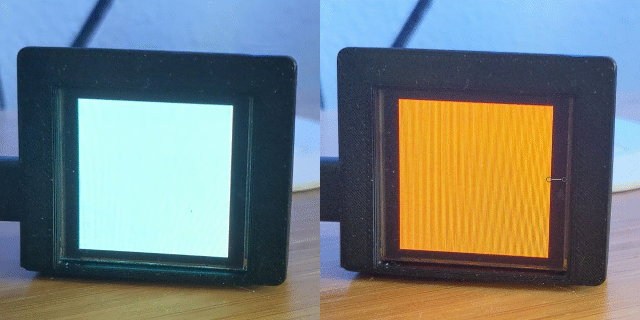
If you run your app now, you should see something like this:
Untitled Project

If not, check your wiring.

Note that the SetDisplayOff code is quite important. If you kill the app before that code executes, you'll notice that the display will be stuck on whatever last screen you were showing. This isn't good for OLEDs, as it can cause burn-in over time. This also happens if your PC goes into standby, so it's a good idea to turn the display off when standby occurs. It's also a good idea to ensure the display is turned off in the event of an exception, so it's good to have that code in a finally statement.
To detect standby, add a reference to the Windows SDKs by setting <UseWindowsForms>true</UseWindowsForms> in your project's PropertyGroup and it'll bring in the required reference. Then add the following code:

Microsoft.Win32.SystemEvents.PowerModeChanged += (s, e) =>
{
    if (e.Mode == Microsoft.Win32.PowerModes.Suspend)
        display?.SetDisplayOff();
    else if (e.Mode == Microsoft.Win32.PowerModes.Resume)
        display?.SetDisplayOn();
}


At this point, we're pretty much all set to make this little display more useful.

Drawing to the display

Let's create a bit of code that writes a message to the screen. We can just use its System.Drawing APIs to draw a bitmap and send it to the device. Let's create a small helper method first to do that:

private void DrawImage(Action<System.Drawing.Graphics, int, int> drawAction)
{
    using System.Drawing.Bitmap dotnetBM = new(128, 128);            
    using var g = System.Drawing.Graphics.FromImage(dotnetBM);
    g.Clear(System.Drawing.Color.Black);
    drawAction(g, 128, 128);
    dotnetBM.RotateFlip(System.Drawing.RotateFlipType.RotateNoneFlipX);
    display.SendBitmap(dotnetBM);
}

Note that we flip the image before sending it, so the display gets the pixels in the right expected order. Next lets modify our little drawing loop, to draw something instead:

DrawImage((g, w, h) =>
{
    g.DrawString("Hello World", new System.Drawing.Font("Arial", 12), System.Drawing.Brushes.White, new System.Drawing.PointF(0, h / 2 - 6));
});
await Task.Delay(1000, stoppingToken);
DrawImage((g, w, h) =>
{
    g.DrawString(DateTime.Now.ToString("HH:mm"), new System.Drawing.Font("Arial", 12), System.Drawing.Brushes.White, new System.Drawing.PointF(0, h / 2 - 6));
});
await Task.Delay(1000, stoppingToken);


You should now see the display flipping between showing "Hello World" and the current time of day. You can use any of the drawing APIs to draw graphics, bitmaps etc. For instance I have the worker process monitor my doorbell and cameras, and if there's a motion or doorbell event, it'll start sending snapshots from the camera to the display, and after a short while, switch back to the normal loop of pages.

Drawing a calendar

Let's make the display a little more useful. Since we can access the WinRT Calendar APIs from our .NET 5 Windows app, we can get the calendar appointments from the system. So let's create a little helper method to get, monitor and draw the calendar:


private Windows.ApplicationModel.Appointments.AppointmentStore? store;
private System.Collections.Generic.IList<Windows.ApplicationModel.Appointments.Appointment> events =
    new System.Collections.Generic.List<Windows.ApplicationModel.Appointments.Appointment>();

private async Task LoadCalendar()
{
    store = await Windows.ApplicationModel.Appointments.AppointmentManager.RequestStoreAsync(Windows.ApplicationModel.Appointments.AppointmentStoreAccessType.AllCalendarsReadOnly);
    await LoadAppointments();
    store.StoreChanged += (s, e) => LoadAppointments();
}
private async Task LoadAppointments()
{
    if (store is null)
        return;
    var ap = await store.FindAppointmentsAsync(DateTime.Now.Date, TimeSpan.FromDays(90));
    events = ap.Where(a => !a.IsCanceledMeeting).OrderBy(a => a.StartTime).ToList();
}

private void DrawCalendar(System.Drawing.Graphics g, int width, int height)
{
    float y = 0;
    var titleFont = new System.Drawing.Font("Arial", 12);
    var subtitleFont = new System.Drawing.Font("Arial", 10);
    float lineSpacing = 5;
    foreach (var a in events)
    {
        var time = a.StartTime.ToLocalTime();
        if (time + a.Duration < DateTimeOffset.Now)
        {
            _ = LoadAppointments();
            continue;
        }
        string timeString = a.AllDay ? time.ToString("d") : time.ToString();
        if (time < DateTimeOffset.Now.Date.AddDays(1)) //Within 24 hours
        {
            if (a.AllDay) timeString = time.Date <= DateTimeOffset.Now.Date ? "Today" : "Tomorrow";
            else timeString = time.ToString("HH:mm");
        }
        else if (time < DateTimeOffset.Now.AddDays(7)) // Add day of week
        {
            if (a.AllDay) timeString = time.ToString("ddd");
            else timeString = time.ToString("ddd HH:mm");
        }
        if (!a.AllDay && a.Duration.TotalMinutes >= 2) // End time
        {
            timeString += " - " + time.Add(a.Duration).ToString("HH:mm");
        }
        var color = System.Drawing.Brushes.White;
        if (!a.AllDay && a.StartTime <= DateTimeOffset.UtcNow && a.StartTime + a.Duration > DateTimeOffset.UtcNow)
            color = System.Drawing.Brushes.Green; // Active meetings are green
        g.DrawString(a.Subject, titleFont, color, new System.Drawing.PointF(0, y));
        y += titleFont.Size + lineSpacing;
        g.DrawString(timeString, subtitleFont, System.Drawing.Brushes.Gray, new System.Drawing.PointF(2, y));
        y += subtitleFont.Size + lineSpacing;
        if (y > height)
            break;
    }
}

Most of the code should be pretty self-explanatory, and most of just deals with writing a pretty time stamp for each appointment. Replace the bit of code that draws "Hello World" with this single one line:

     DrawImage(DrawCalendar);

And you should now see your display alternating between time of day, and you upcoming calendar appointments.

Conclusion

As you can tell, once the display and code is hooked up, it's pretty easy to start adding various cycling screens to your display, and you can add anything you'd like that fits your needs.

I'm using my Unifi client library to listen for camera and doorbell events and display camera motions, I connect to home assistant's REST API to get current temperature outside and draw a graph, so I know if weather is still heating up, or cooling down, and whether I should close or open the windows to save on AC. I have a smart meter, so I show current power consumption, which helps me be more aware of trying to save energy, and when a meeting is about to start, I start flashing the display with a count down (I'm WAY better now at joining meetings on time). There are lots and lots more options you could do, and I'd love to hear your ideas what this could be used for. I do hope in the long run, this could evolve into a configurable application with lots of customization and plugins, as well as varying display size.
On my list next is to use a 2.4" LED touch screen instead, to add a bit more space for stuff, as well as the ability to interact with the display directly.

Parts List

- WaveShare 1.5" OLED
- Adafruit has an FT232H USB-to-SPI board

Source code

Just want all the source code for this? Download it here

Using the C#/Win32 code generator to enhance your WinUI 3 app


With the new C#/WIn32 code generator it has become super easy to generate interop code for Windows APIs. Previously we had to go read the doc and figure out the proper C# signature, or browse pinvoke.net and hope it is covered there. We could also reference an external package like PInvoke.Kernel32, PInvoke.User32 etc. etc. but it would also pull in a lot more dependencies and APIs than you probably need.

Now with the code generator, it's as simple as adding the nuget package, and then add the method name you want to a "NativeMethods.txt" file, and you instantly have access to the method and any structs and enums you need. It also uses all the latest C#9 features for improved interop code.

You can read the full blogpost on this here: https://blogs.windows.com/windowsdeveloper/2021/01/21/making-win32-apis-more-accessible-to-more-languages/


Using the C# Win32 Interop Generator with WinUI 3

The latest WinUI 3 Preview 4 release does have several improvements around improving your window, but there is also a lot still missing. However most of those features can be added by obtaining the window's HWND handle and calling the native Win32 methods directly.

So let's set out to try and control our window using CsWin32.


First, we'll create a new WinUI Desktop project:


image

Next we'll add the Microsoft.Windows.CsWin32 NuGet package the project (not the package project!) to get the Win32 code generator. However, note that the current v0.1.319-beta version has some bugs that you'll see when WinUI is referenced. So instead we'll use the daily build which has been fixed (you can skip this if you're reading this and a new version has been published). Go edit the project file, and add the following to get the latest daily from the nuget server that hosts these builds: (also shout-out to Andrew Arnott for quickly fixing bugs as they were discovered)

  <PropertyGroup>
   <RestoreAdditionalProjectSources>https://pkgs.dev.azure.com/azure-public/vside/_packaging/winsdk/nuget/v3/index.json;$(RestoreAdditionalProjectSources)</RestoreAdditionalProjectSources>
  </PropertyGroup>
  <ItemGroup>
    <PackageReference Include="Microsoft.Windows.CsWin32" Version="0.1.370-beta">
      <PrivateAssets>all</PrivateAssets>
      <IncludeAssets>runtime; build; native; contentfiles; analyzers; buildtransitive</IncludeAssets>
    </PackageReference>
  </ItemGroup>


Next we'll add a new text file to the root of the project named NativeMethods.txt.

Screenshot 2021-02-19 100955

We're now set up to generate the required methods.


The first Win32 method we need is the ShowWindow method in User32.dll, so add the text ShowWindow to its own line in the NativeMethods.txt file.

Note that you should now be able to get auto completion and full intellisense documentation on the method Microsoft.Windows.Sdk.PInvoke.ShowWindow. Pretty cool huh?

Screenshot 2021-02-19 094339

If you use VS16.9+, you can also expand the Project Name -> Dependencies -> Analyzers -> Microsoft.Windows.CsWin32 -> Microsoft.Windows.CsWin32.SourceGenerator and see the code that gets generated.

Screenshot 2021-02-19 094156

None of this is coming from a big library. It's literally just an internal class directly compiled into your application. No external dependencies required, and if you're building a class library, no dependencies to force on your users either.


Controlling the WinUI Window

As you can see in the screenshot above, the first thing we need to do is provide an HWND handle. You can get this from the Window, but it's not obvious, as we need to cast it to an interface we define. Let's create a new static class called WindowExtensions to help us do this:

using System;
using System.Runtime.InteropServices;
using WinRT;

namespace WinUIWinEx
{
    public static class WindowExtensions
    {
        [ComImport]
        [InterfaceType(ComInterfaceType.InterfaceIsIUnknown)]
        [Guid("EECDBF0E-BAE9-4CB6-A68E-9598E1CB57BB")]
        internal interface IWindowNative
        {
            IntPtr WindowHandle { get; }
        }

        public static IntPtr GetWindowHandle(this Microsoft.UI.Xaml.Window window)
            => window is null ? throw new ArgumentNullException(nameof(window)) : window.As<IWindowNative>().WindowHandle;
    }
}


Now we want to call the ShowWindow method. If you read the documentation for this method: https://docs.microsoft.com/en-us/windows/win32/api/winuser/nf-winuser-showwindow you'll see takes a number indicating the desired window state, like 0 for hide, 3 for maximize, 5 for show, 6 for minimize and 9 for restore.

        private static bool ShowWindow(Microsoft.UI.Xaml.Window window, int nCmdShow)
        {
            var hWnd = new Microsoft.Windows.Sdk.HWND(window.GetWindowHandle());
            return Microsoft.Windows.Sdk.PInvoke.ShowWindow(hWnd, nCmdShow);
        }

        public static bool MinimizeWindow(this Microsoft.UI.Xaml.Window window) => ShowWindow(window, 6);
        public static bool MaximizeWindow(this Microsoft.UI.Xaml.Window window) => ShowWindow(window, 3);
        public static bool HideWindow(this Microsoft.UI.Xaml.Window window) => ShowWindow(window, 0);
        public static bool ShowWindow(this Microsoft.UI.Xaml.Window window) => ShowWindow(window, 5);
        public static bool RestoreWindow(this Microsoft.UI.Xaml.Window window) => ShowWindow(window, 9);


Because these are all extension methods, this now enables us to make simple calls inside our Window class like this:

       this.MaximizeWindow();


The CsWin32 code generator just makes this really easy. I've taken all of this a few levels further and started a WinUIEx project on GitHub, where you can see the above code and much more, like setting your windows to be always-on-top or adding a tray icon to your app, so you can minimize to the tray.

You can find the repo on github here:

https://github.com/dotMorten/WinUIEx/

Building custom XAML control panels

One of my favorite XAML Control primitives is the Panel class. It's what drives Grid, StackPanel, Canvas and many many other controls that contains a set of other controls, and controls layout the children out in the view.

So in my second twitch stream, I walked through creating a custom panel that lays out controls in a grid-like manner, without having to do all the row and column definitions. It mainly focuses on the Arrange and Measure steps in the layout life-cycle, which applies to both WPF, UWP and WinUI (or even Silverlight for that matter ;-). And just for fun I used the latest WinUI 3.0 Alpha release (but it really doesn't matter as the concepts are the exact same - only namespaces differs). 


And please subscribe to my YouTube and Twitch channels!

Building your own version of WPF - Live edition

As a follow-up to my blogpost on compiling WPF back when it was still in preview, I tried something new: Live-streamed cloning, compiling and using a local build of WPF in a new app, and make some (evil) modifications to WPF. Even got to submit a PR to the WPF documentation while going though this.

I've been inspired a lot be many others who've started to live-code on Twitch. It's quite interesting to see their thought process and approaches to solving problems - things you never see in a polished 45min conference presentation where everything is prepped and (hopefully) nothing goes wrong. There's quite a lot to learn from seeing people using tools, shortcuts, tricks and tips to solve their problems.

This was a surprising amount of fun, and I'll definitely be doing this again (and hopefully fix some of the issues I had doing this live). I'm prepping some various level 200-400 topics on XAML development, like custom panel and control development, and hope you'll join me. All of these concepts will apply to both WPF, UWP and WinUI, but I figured let's live dangerously and use the latest WinUI Alpha (and we'll log any issues we find as we go).

You can subscribe to my channel at twitch.tv/dotMorten, and I'll be posting the videos after on youtube.com/dotMorten

Here's the recording from yesterday. Feedback and suggestions, as well as ideas for topics to cover would be highly appreciated.


Compiling and debugging WPF

With WPF going open source it’s pretty awesome that we can no clone the code, tweak it, build it and debug right into a local copy of WPF. I see huge potential here, not just for getting bug fixes in, but for instrumenting WPF when you got those extra tricky bugs you’re trying to track down.

However, it was not simple at all to get this stuff working like that. Building it was easy, but I found it surprisingly hard to use the local build. Going back and forth with the WPF team (especially big shout-out to Steven Kirbach), I finally got it working, and already submitted a PR to update the developer documentation.

However I wanted to walk you through a quick step-by-step guide to doing this yourself. All commandline steps below are assumed to be done from the same folder (otherwise you’d have to adjust the paths)

First of all, this approach will not work with .NET Core 3.0.0-Preview6. You need the nightly Preview7, as bug in Preview 6 prevented this from working. Once Preview 7 ships, the extra Preview7-specific steps aren’t needed.

So first step go and download and install the nightly from https://github.com/dotnet/core-sdk (Get the Windows x64 Master installer).

Next open a command prompt and clone the WPF Repo (I assume you have Git installed already). Run the following command:

git clone https://github.com/dotnet/wpf

Now let’s make a small change to WPF we can later see once we get it running. For example, open wpf\src\Microsoft.DotNet.Wpf\src\WindowsBase\System\Windows\DependencyObject.cs and add the following to the DependencyObject constructor:

Debug.WriteLine("Dependency Object created : " + this.GetType().FullName);

This will cause the output window to show each dependency object getting created.

Next let’s build WPF:

wpf\build.cmd –pack

It’ll take a few minutes (especially the first time), and hopefully you won’t see any errors at the end.

OK next up let’s create a new WPF project we can use as a test, using the following command:

dotnet new wpf –o TestApp

This will create a subfolder named “TestApp”. Go into this folder and open up the TestApp.csproj file in Visual Studio. Right-click the project and select “Edit Project File” and add the following to the project below the existing property group:

  <PropertyGroup>
     <!-- Change this value based on where your local repo is located -->
     <WpfRepoRoot>..\wpf</WpfRepoRoot>
     <!-- Change based on which assemblies you build (Release/Debug) -->
     <WpfConfig>Debug</WpfConfig>
     <!-- Publishing a self-contained app ensures our binaries are used. -->
     <SelfContained>true</SelfContained>
    <!-- The runtime identifier needs to match the architecture you built WPF assemblies for. -->
    <RuntimeIdentifier>win-x86</RuntimeIdentifier>
  </PropertyGroup>
  <ItemGroup>
    <Reference Include="$(WpfRepoRoot)\artifacts\packaging\$(WpfConfig)\Microsoft.DotNet.Wpf.GitHub\lib\netcoreapp3.0\*.dll" />
    <ReferenceCopyLocalPaths Include="$(WpfRepoRoot)\artifacts\packaging\$(WpfConfig)\Microsoft.DotNet.Wpf.GitHub\lib\$(RuntimeIdentifier)\*.dll" />
  </ItemGroup>

The following steps are only necessary when using a nightly-build:

  • Save all and pick a place to save the .sln solution file (this step is important). Close Visual Studio and create a new text file “nuget.config”
  • Add the following to the nuget.config file:

<configuration>
  <packageSources>
    <add key="dotnet-core" value="https://dotnetfeed.blob.core.windows.net/dotnet-core/index.json" />
    <add key="dotnet-windowsdesktop" value="https://dotnetfeed.blob.core.windows.net/dotnet-windowsdesktop/index.json" />
    <add key="aspnet-aspnetcore" value="https://dotnetfeed.blob.core.windows.net/aspnet-aspnetcore/index.json" />
    <add key="aspnet-aspnetcore-tooling" value="https://dotnetfeed.blob.core.windows.net/aspnet-aspnetcore-tooling/index.json" />
    <add key="aspnet-entityframeworkcore" value="https://dotnetfeed.blob.core.windows.net/aspnet-entityframeworkcore/index.json" />
    <add key="aspnet-extensions" value="https://dotnetfeed.blob.core.windows.net/aspnet-extensions/index.json" />
    <add key="gRPC repository" value="https://grpc.jfrog.io/grpc/api/nuget/v3/grpc-nuget-dev" />
  </packageSources>
</configuration>

Open the solution back up and build and run. With a little luck your app should launch and you’ll see something like this in the Output Window confirming our change made it (or course you can now also step right into source locally on disk):

Annotation 2019-06-20 213538

The future UWP

There’s been a lot of chatter about UWP lately, it’s future, and some people even going as far as calling it dead after last week’s MSBuild2019 in Seattle. I spent a lot of the time at the conference talking to a lot of stake holders about the future plans, and trying to wrap my head around where things are headed, and giving my feedback about the good and the bad. There’s definitely a lot of confusion here, and I think the Windows team is really stumbling trying to build a good developer story, and really have since Windows 8.0. Why WPF and UWP is under the Windows division and not under the Developer division (who rocks their developer stories) is beyond me.

What is UWP really?

Anyway I think one thing is starting to become more clear. We need to stop talking about UWP as one framework that runs as one type of app. What we need to do is start talking about the bits that is used to make up UWP. In one way you could say UWP is dead as we know it. UWP has had some limitations holding it back, but there are also many great things about UWP too. And to make matters worse, what UWP is has been blurred by confusing messaging, things that weren’t UWP before suddenly maybe sort of are also sometimes called UWP, and there’s been a lack of properly communicating what is really happening to UWP. I think that’s why people like Paul Thurrott saw an opportunity to write a click-bait article announcing the death of UWP right after lots of exciting things are announced about UWP’s future.

So what is UWP? Is it an app in the store? Is it an app only using the WinRT APIs? Or one that relies of some of the WinRT APIs (as well as others)? Is it a sandboxed app? Is it an app that has an app identity with all the features that brings? Is it an .appx/.msix file with clean install/uninstall? Is it an app that uses the newer XAML UI Framework? Is it an app that can run on all sorts of Win10 devices (XBox, HoloLens, Phone, IoT Core, Surface Hub etc)

Historically it’s probably been an app that fits almost all of these. But lately not so much. What we’ve been seeing lately is that UWP is being broken up in to many parts:

- You want the packaging story? You can MSIX it all, and put your Win32 or “UWP” app in the store. Don’t want the store? You still get the benefits of packaging, easy updates and deployment outside the store. This is probably why .NET Framework apps packaged up as MSIX/AppX apps was also called UWP apps: You got some of the UWP features like package ID, live tiles, push notifications etc. yet again muddying what UWP is.

- Do you like a lot of the new WinRT APIs like Bluetooth, push notifications, etc? Well with the SDK Contracts, you can now easily use those in your .NET Framework apps (or any other Win32 app). Just reference the contracts sdk from nuget and you’re good to go:

- You like UWP’s UI Model? Well WinUI is coming to the rescue, allowing you to use the UI Framework either on top of the the Windows Runtime / .NET Core or Win32 / .NET Framework (think XAML islands, perhaps without the islands in the future). UWP’s UI on Win32 running outside the sandbox could be a serious contender for replacing for WPF. It’s all the benefits of a new UI framework that can move fast without being limited by .NET Framework or Windows upgrades, but will run down-level too. Remember: WPF is about 20 year old tech by now.

- Do you want to use .NET Core but still be running in the sandbox with all the previous UWP features? Well that’s coming too with the .NET 5 announcement. One .Net to rule them all.

So talking about UWP like we used to just doesn’t make sense any longer. I don’t want to talk about UWP XAML. I want to talk about WinUI Xaml on top of whichever framework I want (.NET Native, .NET Core, .NET Framework). Or MSIX when we are talking deployment (btw watch this session). Or WinRT/Windows SDK when we are talking about calling the Windows Runtime APIs. So in a way UWP is dead. Long live the bits and pieces of UWP.

.NET Framework and .NET Native is dead.

There I said it.

To be clear: when Microsoft says something is dead, it means complete and utterly out of support. When the community says something is dead, it means it’s in maintenance mode only, just getting bits and pieces of security and hotfix patches. You won’t see anything new and cool there, and you’re sitting on a ticking time-bomb. By all means keep your project on it if you’re yourself in maintenance mode. Otherwise move. Microsoft doesn’t want to freak out customers by saying something is dead, and I get it. It’s a big scary word.

Here’s a slide from one of my .NET Core talks. They are all quotes from Microsoft blogs. You don’t have to read much between the lines to see where things are headed.

image

With the announcement of .NET 5, .NET Framework and .NET Native is at a dead stop. .NET Core 4.0 will be renamed .NET 5 (to avoid the confusion – as I said earlier the dev division are really good at developer stories!), and in addition bring in various features from Mono, like AoT compilation, similar to what .NET Native in UWP offered. So in a way Mono is dead too, but the features it has that .NET Core doesn’t will be brought over, so it’s more of a merge between the two. Finally we only have more or less one .NET Runtime to worry about. Woohoo.

WinUI 3.0 – the future or death of the UWP UI Stack?

This was one of the bigger stories around the UWP stack (apart from getting .NET Core support) See the session here for the details. Historically using new UWP UI Features has been a really big problem. Let’s say you want to use Xaml Islands in UWP. It just went final in 1903. Unfortunately that means you can’t really use it at all, because most of your customers haven’t upgraded yet. You’ll likely have to wait two years before you can use it. WinUI has been solving this lately with a lot of controls. Want to use the latest features of the TreeView control? Well either set you min-version to 1809, or just pull in the WinUI 2.1 nuget package and you can now use the TreeView control down to 1607. However note that you need to change the TreeView control’s namespace from Windows.* to Microsoft.* (so it doesn’t clash with the built-in WinRT TreeView). No big deal – that’s quickly dealt with. And it’s awesome. But all the controls are not there, like the brand new Xaml Island stuff. You need 1903. No way around it.

To solve some of those problems, Microsoft would have to lift the entire UI stack, preferably all the way up to the base UIElement class to solve this. That means the entire UI Framework would be decoupled from the Windows OS, and you’d be able to use all the features on almost any version of Windows 10. This is what was announced they’ll do over the next year, with a preview end of this year (and they’ll even open-source it!), and be released as WinUI 3.0. I got really excited about this, as that meant I could always use the latest greatest features of .NET Standard 2.x+, .NET Core and the UI Stack, without having to drop support for older versions of Windows. Super exciting, and a great move.

Well… until you start digging into the details. The story quickly fell apart when I realized what this really means. Remember how I said to use the WinUI TreeView control all you had to do was change namespace? That works because the WinUI TreeView control still inherits from Windows’ UIElement class, so you can insert it just fine into the existing UI hierarchy.

But what the Windows team intends to do is also change the namespace that UIElement base-class resides in. Suddenly you can’t mix and match new and old UI controls. Once you opt in for WinUI 3.0, ALL your UI must change to use this new UI stack. That means this isn’t the old UWP UI Framework. It’s an entirely new non-compatible one.

Now you’re probably going “no big deal – I’ll just CTRL+H replace all the namespaces and I’m done”. Sure, I hope you’re that lucky, but what if you’re referencing a 3rd party component, and that component hasn’t been updated to use WinUI yet? Well now you’re stuck. Components like Telerik, Windows Toolkit, ArcGIS Runtime, Xamarin.Forms etc all needs to create a breaking-change update that supports the new UI Model. And at the same time, they have to likely support the old UI stack for the customers that are not ready to move yet. And UWP has historically struggled, so I don’t find it unlikely some component vendors will decide just to drop support for it (or wait and see if it catches on), rather than trying to justify the resources needed. And I’m not clear on how us component vendors will even do this, as the TFM will likely be the same (or multiple) and we’ll get clashes between the old and new UI stacks. I’m scared UWP won’t survive a complete reset of the UWP UI stack. On the other hand, it also seems like a necessary move.

Now one of the reasons to bring the UI stack out of band and be able to pick any version is also to be able to more quickly innovate what XAML is and can do, while getting quick adoption of new features from the down-level support it brings. Wait did you say innovate XAML? A language that hasn’t really evolved since it was conceived - and in the process hopefully making me more productive? Oh yes please! Sounds great. Until you’re then told, that by bringing it out of band Microsoft gets the freedom to make more breaking changes without hosing existing users to be able to do this (in order to innovate more). Well back to the component vendors: You just made their life exponentially worse: They now have to rush-out updates for each major version of WinUI and support multiple different versions of WinUI because some users might not be ready to upgrade and deal with all the breaking changes. Forcing breaking changes on the entire ecosystem should be an absolutely big no-no. You could probably ssssmaybe pull it off once, but from then on you really need to stabilize for a very long time, or the entire ecosystem is going to drop out one-by-one. If you ever had to maintain multiple versions of the same product, you know how painful, frustrating and resource intensive this can be.

One thing that really bugged me was that the huge namespace breaking change was not clearly communicated at Build – especially the repercussions it creates – it was literally glossed over as just a quick little rename here and there, and it took talking to a lot of people before this really clicked for me. I later learned there was a roundtable discussion on this for select invited people, so it’s definitely not a surprise for the Windows team. IMHO this really needed to be a more open discussion from the get go and get the community to buy in to this, with the pros and cons discussed more openly.

I did get the chance during Build to discuss a lot of the different ways it could be done and the pros and cons, like don’t bring UIElement out into WinUI, but everything below, but that could hold back innovating on XAML, or break often move quick, but that could kill off the ecosystem, keep compatibility 100% but that would hold back any future change, etc. All of them had pros and cons that sucked, and I’m honestly not entirely clear myself what the right answer is (hence why I think we need big open discussions about all the possibilities). The only thing I would put my foot down on hard: Definitely no more than one breaking change (except for edge-cases / security reasons like how .NET Core has historically done it). It really scared me that frequently breaking everyone was even on the table for discussion.

I also talked a lot to the Xamarin.Forms team about this: They seem just as confused about what to do with this, and they would be forced to add breaking changes too, also hosing all their 3rd party class libraries that have UWP specific renderers. The ripple effects of these WinUI changes are not small at all.

Wrapping up

So where are we at today?

Well first here are some of my concerns:

Wrt. WPF and WinForms. It’s awesome that it’s going open-source on top of .NET Core, but to be honest it’s very unclear how much it is going to evolve past getting it on top of 3.0. They are clearly committing to bring it to .NET Core. But it’s not clear if they are wanting to innovate beyond that, apart from bug fixes and various tweaks. Will we get proper DirectX 11 and composition support? Will we get x:Bind support? Will XAML innovate in WPF? Will we even get any new APIs? Time will tell if this is just a port to .NET Core and then back to maintenance mode, or if it’ll be more than that. No one seemed to be willing to commit to anything when talking to them.

Wrt UWP: It is clear they want to bring the platform forward. The change they’re doing to uncouple much of UWP from Windows is sorely needed to save UWP. But it is not clear how they are going to do it, or how it is going to affect the entire ecosystem. In the process of saving UWP they might just risk killing it off, unless they get a really good migration story and the entire component ecosystem on board quick.

So what should you do with all this stuff going on? Well here’s my recommendation: Whether you do WPF, WinForms or UWP, if it works for you now, continue the course you’re on. You can’t plan for the unknown anyway, and Microsoft generally like to support things for 10 years. Whatever happens I doubt you’ll be setting yourself up for failure – You might just get more options later, and definitely not less. My biggest concern right now is how the changes to WinUI is going to affect the future – especially among component vendors.


Have anything to add? Please continue the conversion in the comments.

- - -

Fun bottom note: What’s happening to UWP is not that it’s being killed: Microsoft is pivoting bringing the bests parts to where we need them. This actually happened before, but it was unfortunately not used as an opportunity to perform a pivot. Remember Silverlight? Guess where .NET Core’s cross-platform CLR came from. And lots of Silverlight’s code also ended up in UWP. Had they only pivoted and said “Yeah we agree Silverlight doesn’t make sense in the consumer spare, but it’s thriving in the enterprise space, so let’s build on that, and we’ll evolve it into .NET Core and Windows Store”. Unfortunately that didn’t go so smooth, and lots of people still suffer from PTSD and wary of whatever Microsoft does that appears to be killing off any technology.

Customizing and building Windows Forms

Today Windows Forms and WPF was made open source, and it now allows you to easier poke around the code, submit fixes and improvements etc. But how do you actually get set up to building your own custom version of Windows Forms and using it in your own application? Here’s a step-by-step approach to that. (The same steps more or less applies to the WPF as repo as well, but at the time of writing this WPF doesn’t have much code shared yet)

Note though: I don’t recommend customizing and using your own Forms version, as forking leads to quickly getting behind the releases, but it’s useful for testing any PRs you might be working on.

Prerequisites:

First install the latest .NET Core 3.0 Preview SDK. If you’re using VS2019 Preview, you’re now good to go. However if you’re using VS2017, then after installation completes, open up Visual Studio settings, and make sure the “Use previews of .NET Core SDK” under “Projects and Solutions –> .NET Core” is turned on.

Annotation 2018-11-30 153211

If you don’t do this, you’ll start getting build errors when building .NET Core 3.0 preview apps saying “The current .NET SDK does not support targeting .NET Core 3.0. Either target .NET Core 2.1 or lower, or use a version of the .NET SDK that supports .NET Core 3.0”.

netcorenotenabled


Building WinForms

The first step is to clone the repo. Use your favorite git tool or clone from commandline using “git clone https://github.com/dotnet/winforms” . Alternatively just download the zip from github and unzip it.

You can now open the “System.Windows.Forms.sln” solution in the root folder. You should see all the source code for forms in the System.Windows.Forms project. Most of the code you care about in there is probably in the System\Windows\Forms folder. Feel free to make some tweaks to the code just for fun. Or go crazy and even add your own new control Smile

Annotation 2018-11-30 151632

However if you add any new classes or members, you’ll also have to go add the same members to the System.Windows.Forms.Ref project in the ‘System.Windows.Forms.cs’. These are just stubs and you can follow the pattern of the other classes to see how it’s done. If you don’t so this, you won’t be able to use the new APIs you’ve added, as this project generates the reference assembly you compile against (while the main one is the one you run against).

Once you’re happy with your custom Windows Forms solution, right-click the “Microsoft.Private.Winforms” project and select “Pack”. Note: If you just compiled everything, this doesn’t do anything – the pack operation only seem to work if there’s also something new to compile (VS bug?), so usually I just quickly touch a file and undo the change to trigger a new compilation.

Annotation 2018-11-30 152547

You can also build and pack from commandline. Browse to the root of the repo, and enter “build –pack” to generate the nuget package with your custom build. Also I encourage you to read the Building Guidelines for more information regarding building Windows Forms.

You should see something like this in the output, including a path to the .nupkg file generated. Make note of this path, as we’ll need it later.

Annotation 2018-11-30 152822

Note: An alternative to packing things up as a nuget package, is to simply use this repo a submodule. In that case all you’d need to do is add the main System.Windows.Forms project to your project, and add a project reference.


Creating our first app with a custom Forms build

Now to use this new build: Open a command prompt and go to a new empty folder. Then enter “dotnet new winforms”. This would generate a new winforms project, with a  .csproj file that you can open in Visual Studio.

Open the project and in the Visual Studio options, navigate to “Nuget Package Manager –> Package Sources”, and add a new package source that points to the \artifacts\packages\debug\shipping\ folder you noted above:

Annotation 2018-11-30 154157

You can now go into the nuget references, and add the nuget package you created:

Annotation 2018-11-30 154338

And voila! You’re now set up to build a WinForms app that’s running on your very own WinForms version.

Here displayed with my very own very important addition to WinForms (PR pending Smile):

Annotation 2018-11-30 154629


Word of caution with this nuget package: If you go back and make more changes to your WinForms project and create a new nuget package, make sure you clear out the package from your NuGet cache, or you won’t see any of the changes, as the newly generated nuget package will have the same ID and Version, and the cache would just kick in and pull from there instead. But if you’re using a fork, you can also add NerdBank.GitVersioning to the project to get auto versions which will update the package ID with each commit.

The alternative is to use the submodule / project reference approach mentioned above which avoids the caching issue.


Thank you to Oren Novotny for reviewing this blogpost prior to publishing (and for generally being awesome to the entire .NET community).

Creating Object Model Diagrams of your C# code

I’ve been playing a lot of the Roslyn API lately, and recently got the idea to use it for analyzing the source-code of an API and report what the API looks like.

When I do API reivews, I often like to look at an Object Model Diagram, and I have often used Visual Studio for this by creating a new Object Model Diagram and dragging my class files onto it. It’s somewhat of a great experience, but it has several limitations and bugs that makes it tedious or misleading.

So I figured why not try and use Roslyn to generate these diagram? After all it’s basically just a list of members in a box. So I set out to create an HTML page with all the objects in a set of C# files.

The first trick is to just search for all C# files in a folder and add them to an AdHocWorkspace and compile the project:

var ws = new AdhocWorkspace();
var solutionInfo = SolutionInfo.Create(SolutionId.CreateNewId(), VersionStamp.Default);
ws.AddSolution(solutionInfo);
var projectInfo = ProjectInfo.Create(ProjectId.CreateNewId(), VersionStamp.Default, "CSharpProject", "CSharpProject", "C#");
ws.AddProject(projectInfo);
foreach(var file in new DirectoryInfo(path).GetFiles("*.cs"))
{
    var sourceText = SourceText.From(File.OpenRead(file.FullName));
    ws.AddDocument(projectInfo.Id, file.Name, sourceText);
}
var project = ws.CurrentSolution.Projects.Single();
var compilation = await project.GetCompilationAsync().ConfigureAwait(false);

This quickly gives us a fully parsed set of C# files that we can now iterate over, and interrogate the members. By ignoring everything that’s internal or private, a bit of stream writing out to some basic HTML, I can generate an object model that looks a lot like what Visual Studio produces. Here’s one such example of my NmeaParser library:

image

You can see the full object model here: /omds/NmeaParser.html

Note that you can hover on classes, members and parameters and you’ll get the <summary/> API Reference description for them. Known types that are in the object model are also clickable for quickly navigating the view.

I created a .NET Core console app that builds this. All you do is set the source parameter to a folder of source-code, and the tool runs on spits out an “OMD.html” file. I found myself often wanting to generate an OMD of a Github repo, so as a shortcut I added an option to point straight to the zip-download on GitHub. The above object model diagram is done with this simple command:

image

I’ve already started using this tool in my day-to-day work, as well as some of the online community work, like the UWP Community Toolkit. What I’ve found is that inconsistencies and poor naming really stands out like daggers in your eyes when looking at an object model, compared to scanning over 100s or 1000s lines of code. Internal code is easy to fix later. But if you get the public object model wrong, you’re stuck between introducing breaking changes, or living with the poor API design forever.

Want to go overboard? Try generating a giant OMD for the entire .NET Core repo (we’ll exclude all the test folders):

dotnet Generator.dll /source=https://github.com/dotnet/corefx/archive/master.zip /exclude="*/ref/*;*/tests/*;*/perftests/*" /output=CoreFX.html

You can also see the generated output here: /omds/CoreFX.html


Commandline? Where’s my NuGet?

What if you want to just create an object model when you build? Well there’s a NuGet for that. Add a NuGet reference to “dotMorten.OMDGenerator”, and each time you build your C# Class Library, an HTML file is also generated. It will slow your build down slightly. so you might not want it enabled all the time, but it’s an easy way to quickly generate an object model. Note though that this is limited to generating an OMD for a single project, and not a combined OMD for all .


Analyzing differences

Another thing I very often do is looking pull requests, and when you have 100s of objects, it’s not really useful to be looking at the entire object model. Instead you want to focus on what changed, and if it introduced any breaking changes. I basically needed a diffing-tool.

Again it was rather easy to use Roslyn to do this. I basically created a list of objects for two source code folders, and walked through member by member. By using Roslyn’s “ToDisplayString” method with a full-format string, it’s really just a matter of comparing the before/after generated string go detect a change, and only print out classes and members that changed. I then chose to render anything that was removed as red and strike-through to make it really clear what has changed. Again with PRs this makes it really easy. For instance here’s how to do a comparison between

image

If you want to try it yourself, here’s the commandline tool:

dotnet Generator.dll
/source=https://github.com/Microsoft/UWPCommunityToolkit/archive/master.zip
/compareSource=https://github.com/Microsoft/UWPCommunityToolkit/archive/rel/2.2.0.zip
/exclude="*/UnitTests/*"
/output=UWPToolkit_WhatsNew.html

And here’s some of what that generates as of today:

image

You’ll notice that there are several changes highlighted in red. These are not necessarily breaking changes - some of them are*, and some could just be a slight change in signature (*The UWP Toolkit is currently working on v3.0 which includes cleaning up some old stuff and will have breaking changes)

We can also repeat this for .NET Core, and see what has changed since v2.0:

image

You can see the full change-list here: /omds/CoreFx_WhatsNew.html

Note that this will show breaking changes in .NET Core: But feat not: Just because it was in the v2.0.0 branch, there were things that weren’t actually released, and has been changed since. Another issue is the source structure has changed and some base types where not there before. This caused some of the types to look as if they are changed. The point is that the analysis is only as good as the source code it has access to. Another example of this you’ll see is if a class implements an interface, but doesn’t have a base class, and that interface isn’t part of the source code, there’s no way for Roslyn to know if it’s an interface or a base-class, and it’ll end up listing the interface as a base class.

Also there are probably still some bugs left. Not only will it show things that might not be a breaking change as a breaking change – it might also overlook changes, so use it as a tool to help you, but not as the end-all-be-all public API review tool.


Gimme the source-code already!

Yup! It’s right here: https://github.com/dotMorten/DotNetOMDGenerator

I take pull-requests too! If you see a bug, feel free to submit a PR (or at the very least submit an issue).


The future…

Things I’d like to add support for (and wouldn’t mind help with):

  • Assembly-based analysis (ie post-compilation).
  • Use solutions and project files as inputs
  • Git-hook that automatically injects an object model of changes (if there’s changes), when a user submits a pull request.
  • Support for accessing the zip-download from private repos
  • Support for specifying two branches in a local repo, instead of having to have two separate source folders.

Building an ARM64 Windows Universal App

If you read the recently release documentation on Windows 10 on ARM, you get the impression you can only build x86 and ARM 32bit applications.

However it is completely possible today to build and run a native ARM64 UWP application as long as you use C++ (.NET isn’t - at this point at least - supported). I’ll detail the steps below:

First we need to ensure you have the ARM64 C++ compiler pieces installed. Open the Visual Studio installer and ensure the ARM64 components are installed:

image

Next we create a new UWP C++ Application:

image

Open the configuration manager, and select a new solution platform:

ConfigManager

Pick ARM64:

ConfigManager2

In the project properties you can now also see that the Target Machine is set to MachineARM64:

ProjectProperties

Now all you have to do is compile the app. Or well… maybe not!

BuildError

This build error occurs due to a but in the .targets file, ARM64 isn’t really fully supported yet, and some of the build settings isn’t expecting ARM64. Luckily it’s hitting a part that isn’t needed, so we can trick MSBuild to skip over this.

Open your .vcxproj project file and add the following fake property:

<ProjectNTagets>Some silly value here </ProjectNTagets>

ProjectFix

And Voila! Your project should now compile:

BuildSuccess

Next we can create a new app package. ARM64 should now show up in the list, and you can check that on as well, to generate a package that runs natively on any architecture Windows ships on:

CreatePackageDialog

Success!

PackageCreationComplete

That’s all there is to it!

Now next is to get hold of an ARM64 device and figure out how to deploy and debug this. Once I have a device, I’ll post the next blog…

Speeding up multi-architecture compilation by parallelizing your build

I’ve lately been working on getting our automated builds complete faster. Faster builds means shorter times between commits and new fresh builds, gated check-ins can be evaluated faster etc etc. In my specific case, I need to build and link A LOT of native C++ code for both x86, x64 and ARM, and the full process takes over 1.5 hours on my speedy desktop, and over 2 hours on the build server!

As part of this work, wanted the build server to only focus on the builds that were important for the product, but still have a solution that builds unit tests, test project etc for the devs to use day to day. Also because we build both AnyCPU .NET libraries and architecture-specific apps and native libraries, the build server would while building each architechture also build the AnyCPU builds over and over, and the build server also didn’t really need to build the unit tests as part of the production build either.

Now I could go about and create a separate build configuration, but I wanted to make sure the build configuration devs use day to day matches what the build server uses. So I opted for creating an “msbuild” file instead. This is essentially a little project file, that points to other projects to build. Here’s a small example of such a file:

<Project xmlns="http://schemas.microsoft.com/developer/msbuild/2003">    
     <Target Name="BuildMyProduct">
       <MSBuild Projects="MyCoolApp\MyCoolClassLibrary.csproj" Properties="Platform=AnyCPU;Configuration=Release" Targets="Restore;Build" />
       <MSBuild Projects="MyCoolApp\MyCoolApp.csproj" Targets="Restore" />
       <MSBuild Projects="MyCoolApp\MyCoolApp.csproj" Properties="Platform=x86;Configuration=Release" Targets="Build" />
       <MSBuild Projects="MyCoolApp\MyCoolApp.csproj" Properties="Platform=x64;Configuration=Release" Targets="Build" />
       <MSBuild Projects="MyCoolApp\MyCoolApp.csproj" Properties="Platform=ARM;Configuration=Release" Targets="Build" />
     </Target>
</Project>

From a Visual Studio command prompt you can use msbuild to execute your ‘BuildMyProduct’ target:

           msbuild /t:BuildMyProduct

And the project will nuget restore and build first the class library, then build the app project 3 times for each architecture (with a single nuget restore before it). You can see from the output that things are built in the order specified, one after the other. Note how the same output for the app project essentially repeats 3 times:

SequentialBuild


The thing is, several of the compilation process is single-threaded, but these days we all have 4, 8, 16 etc cores to play with. Why not put them all to good use and speed up the build? Especially linking a lot of native C++ static libraries are mostly single threaded and can easily take a very long time. Why not use a CPU for each architecture?

We can accomplish this in msbuild by creating a group of projects with different properties, and use the “BuildInParallel” parameter. Here’s what that same project would then look like:

<Project xmlns="http://schemas.microsoft.com/developer/msbuild/2003"
    <Target Name="BuildMyProduct">
       <ItemGroup>
         <MyCoolAppProject Include="MyCoolApp\MyCoolApp.csproj" AdditionalProperties="Platform=x86" />
         <MyCoolAppProject Include="MyCoolApp\MyCoolApp.csproj" AdditionalProperties="Platform=x64" />
         <MyCoolAppProject Include="MyCoolApp\MyCoolApp.csproj" AdditionalProperties="Platform=ARM" />
       </ItemGroup>
       <MSBuild Projects="MyCoolApp\MyCoolClassLibrary.csproj" Properties="Platform=AnyCPU;Configuration=Release" Targets="Restore;Build" />
       <MSBuild Projects="MyCoolApp\MyCoolApp.csproj" Targets="Restore" />
       <MSBuild Projects="@(MyCoolAppProject)" Properties="Configuration=Release" Targets="Build" BuildInParallel="True" />
     </Target>
</Project>

In this case we’ll add the /maxcpucount parameter to ensure msbuild uses all the available CPUs:

           msbuild /t:BuildMyProduct /maxcpucount

Build in parallel output below. Note hos the output is exactly the same, but now each architecture output more or less outputs in the same order and completes simultaneously.

ParallelBuild

But much more importantly, notice the 40% reduction in build time! And this is for a completely blank UWP app template. This is no small reduction. And remember if you have lots of native code to link, you can see even bigger saves. In my specific case, I have A LOT of static libraries to link, which takes between 22 and 35mins to just link depending on architecture. The entire build takes about 90mins to complete. When building in parallel, that’s “only” 38 minutes. This is HUGE for pushing out fresh setups to test, or enabling gated check-ins.


Now for UWP you might want to create a single bundle for all architectures, and you can do that with a single command that’ll build all architectures:

    <Target Name="BuildFullBundle">
       <MSBuild Projects="MyCoolApp\MyCoolApp.csproj" Targets="Restore" />
       <MSBuild Projects="MyCoolApp\MyCoolApp.csproj" Targets="Build" Properties="Configuration=Release;AppxBundle=Always;AppxBundlePlatforms=x86|x64|ARM" BuildInParallel="True" />
     </Target>

The interesting bit here is that msbuild doesn’t actually parallelize this build (though it probably should) as clearly visible in the output, and you get the same “slow” build time.

AppxBundleBuild