A Simple Way To Use App Simulator For App Purchases

When you are testing In-App purchasing in your Windows 8 app, you need to use “Windows.ApplicationModel.Store.CurrentAppSimulator” static class instead of “Windows.ApplicationModel.Store.CurrentApp”. This means you’ll end up writing a lot of code like this:

     var licenseInformation =
#if DEBUG
           Windows.ApplicationModel.Store.CurrentAppSimulator.LicenseInformation;
#else
           Windows.ApplicationModel.Store.CurrentApp.LicenseInformation;
#endif
//...
     string receipt = await
#if DEBUG
            Windows.ApplicationModel.Store.CurrentAppSimulator.
#else
            Windows.ApplicationModel.Store.CurrentApp.
#endif
            RequestProductPurchaseAsync(featureName, true)

Yes this gets ugly really quick. Here’s a neat little trick to get around that. Right below your using statements at the top of your file, simply add this alias mapping:

#if DEBUG 
    using Store = Windows.ApplicationModel.Store.CurrentAppSimulator; 
#else 
    using Store = Windows.ApplicationModel.Store.CurrentApp; 
#endif

And in your code you can now simply write:

     var licenseInformation = Store.LicenseInformation; 
     string receipt = await Store.RequestProductPurchaseAsync(featureName, true);

The Windows Phone Quirks Mode And 3rd Party Libraries

With the new Windows Phone 8.0 OS a lot of things has changed with the new kernel and CLR, and in addition there are quite a few breaking changes to the SDK. However WP8 has a “quirks mode” that it uses to detect if an app was built for 7.1 (Mango), it will execute it as if it was running on a WP7.1 device. That means that if your app is using some of the features that has changed in WP8, it should continue to run with no problems (I have identified several compatibility issues though). This is great because the over 120,000 apps in the store today should (for the most part) work on your new WP8 device.

However if you upgrade your app and compile it for WP8, you will exit this quirks mode, and your app could potentially break if you are subject to any of the breaking changes. You can find a good list of the breaking changes here: http://msdn.microsoft.com/en-US/library/windowsphone/develop/jj206947(v=vs.105).aspx

Upgrading poses a big problem though: Most of you are probably relying on 3rd party libraries that haven’t been upgraded to or certified for WP8. The Quirks Mode is enabled for your entire app, and cannot run parts of your app in quirks mode, and other parts outside quirks mode. This means if your 3rd party library hits any of these breaking changes and you use it in a WP8 app, your app WILL break.

image

If you are a 3rd party library developer, you should test your library for compatibility. If you find any issues, you should probably release two versions, one for WP7 and one for WP8.

Of course if you don’t really need any of the new WP8 features, my recommendation is to stick to WP7.1; - at least until there’s a big enough user-base for WP8 and a small WP7.1 user-base.

Note: All this also applies to good old browser Silverlight which have had quirks mode for a long time, so this isn’t a new concept. This is actually the reason that the product I work on releases both Silverlight 4 and Silverlight 5 versions, because the Silverlight 4 assemblies causes problems when used in a Silverlight 5 app. We had a lot of customers still stuck on SL4 and others who wanted to use new SL5 features, so we chose to support both for some time. The same will be the case for WP7 which will be around for a while, and you might have to support both.

Why Windows Phone 8 Excites Me

I'm here at the build conference, where it was announced that we finally got access to the Windows Phone 8 SDK. I’ve been browsing the SDK reference, and found a bunch of stuff that I think is going to make this phone huge.
To me, it’s not about the new improved tile interface, the camera lenses or skype integration. It’s what’s under the hood that is really going to make a difference, allowing us to finally build amazing apps that sometimes were hard or flat out impossible.

So a lot of it is missing features that I felt has been holding back the WP7.5 platform (and will continue with 7.8 which is a sorry excuse of an update that’ll confuse consumers), but I can honestly say that I think the feature-set in the WP8 SDK is a home run and there’s nothing big missing from there that I need (even some stuff I didn’t think I need that I now do :-). I know some of these features are available on other platforms already (flamers move on), but the combination of all of these is what makes this all great.

Enterprise ready

We finally get a full enterprise story with your own “enterprise store”. Before WP8, the only option to deploy apps in the enterprise was developer unlock all the phones, or put them in the store as betas (that expires after 3 months) or make them publicly available but hidden behind a login. None of them was a very good solution. We now get a proper enterprise marketplace for easy deployment and update of enterprise apps.

Bluetooth devices

We now get access to bluetooth devices. This is huge and can spawn a new type of eco system. In my work area that means could mean super-high-precision GPS receivers and laser range finders just to start. But in other areas this could be for instance credit card readers and barcode scanners to do on-the-spot purchasing.

Background downloader

Allows you to queue up large downloads while your app is not running. Great for loading larger amounts of data that your app needs for a specific job or for being offline for extended time.

Hot-swappable storage

With hot-swappable storage you can quickly provision large amounts of data to bring with you in the field. Again this could be huge for the enterprise solution. Having to provision data over the air could be an issue even with the background downloader (think gigabytes of data). Imagine highly detailed maps for a specific region you’re about to enter – you bring the right SD card for that area, and someone else brings another SD card with data for their area.
And for those who just want to throw music on there and needs more space: It’s greatc for that too :-)

Direct3D

Direct3D support! We now get direct access to the GPU. This allows us to write high-performance rendering for games, maps, etc. Note: There’s no Direct2D support (but I’m sure someone will build that on top of D3D for us soon, since it really just an abstraction on top of the 3D libraries).

Native code support

We can now write/reuse/run native code on our smartphones. You might not want to write C++, but there are huge amounts of libraries today written in C++ that we can now use. Think of for instance the Sqlite Database. Where I work we have huge amounts of native libraries that has taken years to develop and would be near-impossible to port to .NET, not to mention they require the fastest possible processing of large amounts of data, and C++ is more or less unmatched for that purpose. This doesn’t mean you have to write your entire app in C++. It could just mean that you bring in a native library (like Sqlite) and code against it from C#. The integration is very similar to WinRT (in fact they call it WinPRT – ‘P’ for Phone, and shares a lot of libraries too). So you might never have to worry about native code, but you can still get the benefit of other 3rd parties’ hard work!

.NET

Having .NET (and C#/VB.NET) is not really a new feature, but having worked in the ISV space for many years, and delivering SDKs to smaller ISVs, I know how important it is to have a .NET SDK. Many smaller businesses often have a developer or two, and most of them I find to be .NET developers. The fact that they can write a quick app for their enterprise in an environment that are familiar to them will be huge. This is probably the biggest differentiator to all the other phone platforms.


New Windows Phone 8 SDKs (slide from Build Keynote)

Shortcut Key Handling in Windows Store Apps

I wanted to create a simple ALT+S shortcut in my app to jump to a TextBox in my Windows Store App (no this is not the Win+Q search charm shortcut). However, this is not that obvious to get working app-wide, so I’ll share it here:

The obvious way to do this is assign a KeyDown event to your page using the typical “this.KeyDown += MyKeyDownHandler”, or override OnKeyDown. However this has one problem: If any control that has focus currently handles key down events (like TextBox), this event won’t be raised due to how event bubbling works. However there is another way to create an event handler that overrides the bubbling: UIElement.AddHandler. In the 3rd parameter of that, you can specify that you want to be notified even if the event has been handled. Here’s what that looks like for listening to the event app-wide:

Window.Current.Content.AddHandler(UIElement.KeyDownEvent, new KeyEventHandler(App_KeyDown), true);
//...
private void App_KeyDown(object sender, KeyRoutedEventArgs e)
{
     //Handle Key Down
}

If you attach to Window.Current.Content, be sure to detach again in OnNavigatingFrom, or you’ll risk having a memory leak, and also still get events firing in that page when it’s not loaded any longer. If you just want this within the page, use myPage.AddHandler of Window.Current.Content.AddHandler, but beware that if anything outside this page has focus the event won’t be raised. – at least in that case you don’t need to worry about unhooking again though.

Now second is to handle the key combination. You can check the menu/alt key status using the following line of code:

bool isMenuKeyDown = CoreWindow.GetForCurrentThread().GetAsyncKeyState(VirtualKey.Menu) == CoreVirtualKeyStates.Down;

So the obvious handler code would look like this:

private void App_KeyDown(object sender, KeyRoutedEventArgs e)
{
    if (e.Key == Windows.System.VirtualKey.S)
    {
        if(CoreWindow.GetForCurrentThread().GetAsyncKeyState(VirtualKey.Menu) == CoreVirtualKeyStates.Down)
        {
            //Handle key combination… 
} } }

Turns out the above code only works every other time. When reading the documentation on GetAsyncKeyState it states that “Determines whether a key is up or down at the time the function is called, and whether the key was pressed after a previous call to GetAsyncKeyState.

So basically this method changes its result based on whether it was called before, and not solely whether the key is down or not. This makes no sense to me why it was designed like this (but do feel free to explain in the comments if you know).

Anyway, if we just make sure this method is always called in the handler it now starts working predictably. So here’s my snippet that ckecks if ALT+S is pressed, sets focus on my textbox and selects all the text:

private void App_KeyDown(object sender, KeyRoutedEventArgs e)
{
    bool isMenuKey = CoreWindow.GetForCurrentThread().GetAsyncKeyState(Windows.System.VirtualKey.Menu) == CoreVirtualKeyStates.Down;
    if (isMenuKey && e.Key == VirtualKey.S)
    {
        queryTextBox.Focus(FocusState.Keyboard);
        queryTextBox.SelectAll();
    }
}

Using User-Provided Images for Secondary Tiles

Often when you are creating a secondary tile in Windows 8, it will be based on images coming from the internet.  However a requirement of secondary tile images are that they need to be stored locally. I initially had some problems getting this working right and the streams closed correctly for this to work, so here’s the code for other to use and save the hazzle:

public async static Task CreateSecondaryTileFromWebImage(
    string tileId, Uri imageUri, string shortName, string displayName,
    string arguments, Rect selection)
{
    //Download image to LocalFolder and use the tileId as the identifier
    string filename = string.Format("{0}.png", tileId);
    HttpClient httpClient = new HttpClient();
    var response = await httpClient.GetAsync(imageUri);
    var imageFile = await ApplicationData.Current.LocalFolder.CreateFileAsync(filename, CreationCollisionOption.ReplaceExisting);
    using (var fs = await imageFile.OpenAsync(FileAccessMode.ReadWrite))
    {
        using (var outStream = fs.GetOutputStreamAt(0))
        {
            DataWriter writer = new DataWriter(outStream);
            writer.WriteBytes(await response.Content.ReadAsByteArrayAsync());
            await writer.StoreAsync();
            writer.DetachStream();
            await outStream.FlushAsync();
        }
    }
    //Create tile
    Uri image = new Uri(string.Format("ms-appdata:///local/{0}", filename));
    SecondaryTile secondaryTile = new SecondaryTile(tileId, shortName, displayName, arguments, TileOptions.ShowNameOnLogo, image);
    secondaryTile.ForegroundText = ForegroundText.Light;
    await secondaryTile.RequestCreateForSelectionAsync(selection, Windows.UI.Popups.Placement.Above);
}

Often this is enough, but there is still a small problem. What if the image is very light, and the text you display on top of it is white, thus drowning in the background image? You could set the tile text to black, but then what happens if the image is dark? And if it has a lot of texture in it, the text still gets very unreadable. Since you might not know up front what the image looks like, whether it’s dark or bright, or textures, we will need a way to ensure the text will still look good on top of the image.

image

Unfortunately full WriteableBitmap support in WinRT isn’t there to help us out modifying the image, but we do get low-level access to the pixel buffer of the image, so we could fairly simple darken or brighten the bottom a bit to ensure the image looks good as a backdrop for the text.

I wrote a little utility that loads the image, gradually darkens the bottom 40% of the image before saving it back. I’ve found that doing a slight graduated darkening on photos isn’t too noticeably, while making the text in front of it much more readable. So with out further ado, here’s my simple image pixelbuffer modifier:

private async static Task DarkenImageBottom(string filename, string outfilename)
{
    var file = await ApplicationData.Current.LocalFolder.GetFileAsync(filename);
    BitmapDecoder decoder = null;
    byte[] sourcePixels = null;
    using (IRandomAccessStream fileStream = await file.OpenReadAsync())
    {
        decoder = await BitmapDecoder.CreateAsync(fileStream);
        // Scale image to appropriate size 
        BitmapTransform transform = new BitmapTransform();
        PixelDataProvider pixelData = await decoder.GetPixelDataAsync(
            BitmapPixelFormat.Bgra8,
            BitmapAlphaMode.Straight,
            transform,
            ExifOrientationMode.IgnoreExifOrientation, // This sample ignores Exif orientation 
            ColorManagementMode.DoNotColorManage
        );
        // An array containing the decoded image data, which could be modified before being displayed 
        sourcePixels = pixelData.DetachPixelData();
        fileStream.Dispose();
    }
    if (decoder != null && sourcePixels != null)
    {
        for (uint col = 0; col < decoder.PixelWidth; col++)
        {
            for (uint row = (uint)(decoder.PixelHeight * .6); row < decoder.PixelHeight; row++)
            {
                uint idx = (row * decoder.PixelWidth + col) * 4;
                if (decoder.BitmapPixelFormat == BitmapPixelFormat.Bgra8 ||
                    decoder.BitmapPixelFormat == BitmapPixelFormat.Rgba8)
                {
                    var frac = 1 - Math.Sin(((row / (double)decoder.PixelHeight) - .6) * (1 / .4));
                    byte b = sourcePixels[idx];
                    byte g = sourcePixels[idx + 1];
                    byte r = sourcePixels[idx + 2];
                    sourcePixels[idx] = (byte)(b * frac);
                    sourcePixels[idx + 1] = (byte)(g * frac);
                    sourcePixels[idx + 2] = (byte)(r * frac);
                }
            }
        }

        var file2 = await ApplicationData.Current.LocalFolder.CreateFileAsync(outfilename, CreationCollisionOption.ReplaceExisting);

        var str = await file2.OpenAsync(Windows.Storage.FileAccessMode.ReadWrite);
        BitmapEncoder enc = await BitmapEncoder.CreateAsync(BitmapEncoder.PngEncoderId, str);
        enc.SetPixelData(BitmapPixelFormat.Bgra8, BitmapAlphaMode.Ignore, decoder.PixelWidth, decoder.PixelHeight,
            decoder.DpiX, decoder.DpiY, sourcePixels);
        await enc.FlushAsync();
        str.Dispose();
    }
}

So we can call this utility prior to creating the secondary tile request. Compare the before(left) and after (right) here:

imageimage

The image difference is barely noticeable, but the text is much more readable.

You can download the tile utility class and sample app here.

Rotating Elements in XAML While Maintaining Proper Flow

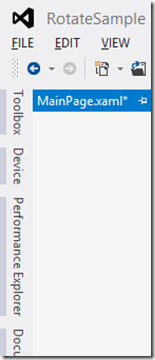
I recently had to lay out some text vertically stacked on top of each other in Windows 8, similar to how tabs in Visual Studio are laid out.
image

The obvious way to do that would be to first place the texts in a stack panel, and then rotate them like so:

<StackPanel>
    <TextBlock Text="Text 1">
        <TextBlock.RenderTransform>
            <RotateTransform Angle="90" />
        </TextBlock.RenderTransform>
    </TextBlock>
    <TextBlock Text="Text 2">
        <TextBlock.RenderTransform>
            <RotateTransform Angle="90" />
        </TextBlock.RenderTransform>
    </TextBlock>
    <TextBlock Text="Text 3">
        <TextBlock.RenderTransform>
            <RotateTransform Angle="90" />
        </TextBlock.RenderTransform>
    </TextBlock>
</StackPanel>

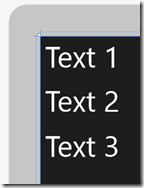
This is what it looks like without the RotateTransform:
image

And after adding rotation:

image

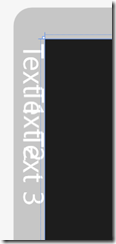
Notice how the text is now outside the containing StackPanel, and overlapping each other? So what happened? The problem is that RenderTransform is applied AFTER the layout cycle occurs so StackPanel has no way of placing these elements, since it already did it’s job prior to rotating the text. We’ll get back to how to resolve this, but let’s first cover the layout cycle, which consists of two steps: Measure and Arrange.

In the Measure step, each TextBlock is measured. This is basically the step where the parent control – in this case the StackPanel – tells each TextBlock “If you have [x,y] space, how much of that would you like to have?”. It does this by calling TextBlock.Measure(Size) on each of them. The TextBlock then reports back the size it would like to have using the .DesiredSize property. You will notice that controls’ DesiredSize property will always return (0,0) until the Measure step has run. Usually for TextBlocks it would report back the size of the text. If the text doesn’t fit within the width that the StackPanel provided and TextWrapping was enabled on the TextBlock, the TextBlock might choose to break the text and report a taller height instead, so it can keep inside the width it was provided with.

The next step is the Arrange step. This occurs after all children has been measured, and the StackPanel here decides how much space it will provide to each control. While the TextBlocks provided a certain DesiredSize, they might not actually get that much space – that’s all up to the parent control – for instance for a Grid’s columns and rows with auto and * sizes, the measure step helped it determine how much space each row and column will be, and then applies that to each element during arrange. Arrange is done by calling .Arrange(Rect) on each element, providing them with a rectangle to place itself within.

So back to our problem: How can we use this knowledge to get the layout cycle to proper place my rotated textblocks?

Well first of all, when we rotate an element 90 degrees, the width of the text becomes the height, and vice-versa. So if we were to “swap” the width and height during Arrange, we should be able to prevent the overlapping and ensure that there’s enough width, errr height for each TextBlock so they don’t overlap. During the arrange step, we can ensure that the elements gets placed right and doesn’t end up outside the containing control.

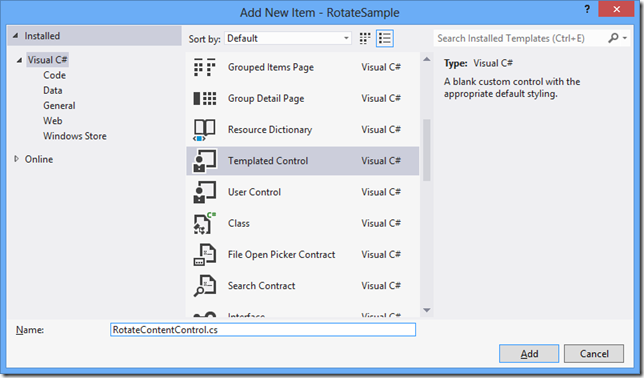
To do that, the first thing we’ll do is create a new control. Add a new TemplatedControl to your project:
image

A new class inheriting from Control will be created, as well as a new \Themes\Generic.xaml template (if you already have a Generic.xaml file, the following will be added):

Let’s get rid of the Border in this template, and add a simple ContentControl instead:

<ResourceDictionary
    xmlns="http://schemas.microsoft.com/winfx/2006/xaml/presentation"
    xmlns:x="http://schemas.microsoft.com/winfx/2006/xaml"
    xmlns:local="using:RotateSample">

    <Style TargetType="local:RotateContentControl">
        <Setter Property="Template">
            <Setter.Value>
                <ControlTemplate TargetType="local:RotateContentControl">
                    <Border
                        Background="{TemplateBinding Background}"
                        BorderBrush="{TemplateBinding BorderBrush}"
                        BorderThickness="{TemplateBinding BorderThickness}">
                    </Border>
<ContentControl x:Name="Content" Content="{TemplateBinding Content}" />
</ControlTemplate> </Setter.Value> </Setter> </Style> </ResourceDictionary>

Next let’s add a Content dependency property to our class so that we can bind to the content. We’ll also add a Content property to the class, to signify that anything that is used as content inside this control in XAML is meant to be assigned to the Content property. Our control now looks like this:

[Windows.UI.Xaml.Markup.ContentProperty(Name="Content")]
public sealed class RotateContentControl : Control
{
    public RotateContentControl()
    {
        this.DefaultStyleKey = typeof(RotateContentControl);
    }

    public object Content
    {
        get { return (object)GetValue(ContentProperty); }
        set { SetValue(ContentProperty, value); }
    }

    public static readonly DependencyProperty ContentProperty =
        DependencyProperty.Register("Content", typeof(object), typeof(RotateContentControl), null);      
}

Now if we were to run the app using this control, it’ll basically be the same as using a ContentControl.

<local:RotateContentControl>
    <TextBlock Text="Text 1" FontSize="32" Margin="5" />
</local:RotateContentControl>

Of course this is not much fun, so let’s first use the OnApplyTemplate to grab the content and apply the rotation to the content:

private ContentControl m_Content;
private const double rotation = 90;
protected override void OnApplyTemplate()
{
    m_Content = GetTemplateChild("Content") as ContentControl;
    if (m_Content != null)
    {
        m_Content.RenderTransform = new RotateTransform() { Angle = rotation };
    }
    base.OnApplyTemplate();
}

If you run the sample now, we’ll basically be back to where we started with the texts offset and placed outside the parent container. You can see that the StackPanel is highlighted below with the size it thinks it needs to be to hold the TextBlocks, which doesn’t match the actual size of the TextBlocks:
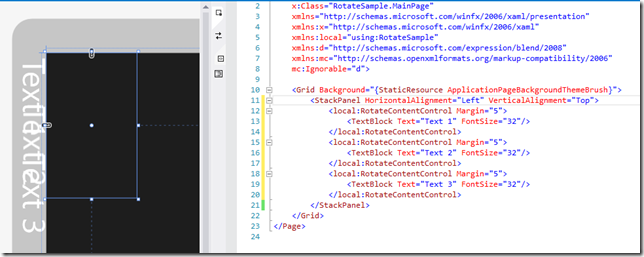
image

So let’s first override the Measure step and swap width and heights:

protected override Windows.Foundation.Size MeasureOverride(Windows.Foundation.Size availableSize)
{
    if (m_Content != null)
    {
        m_Content.Measure(new Size(availableSize.Height, availableSize.Width));
        return new Size(m_Content.DesiredSize.Height, m_Content.DesiredSize.Width);
    }
    else
        return base.MeasureOverride(availableSize);
}

You’ll now see the following happen – notice how the height and width is now correct for the StackPanel if the TextBlocks were rendered in the right place, but we start seeing clipping on the TextBlocks:
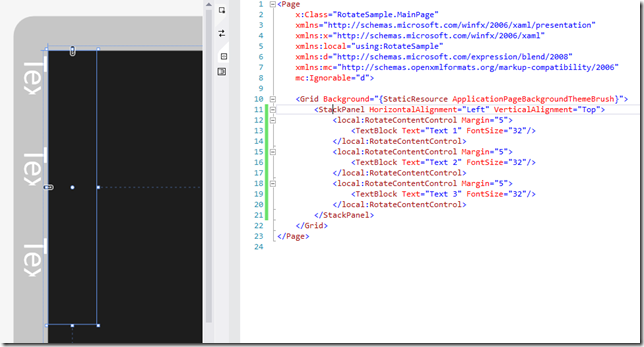
image

This happens because the ArrangeStep still uses the unswapped width/height and causes clipping. Let’s next override the Arrange and swap width and height here as well:

protected override Size ArrangeOverride(Size finalSize)
{
    if (m_Content != null)
    {
        m_Content.Arrange(new Rect(new Point(0, 0), 
new Size(finalSize.Height, finalSize.Width))); return finalSize; } else return base.ArrangeOverride(finalSize); }

And the result we get is:
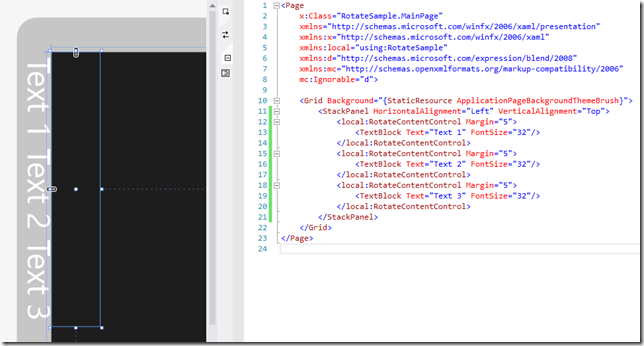
image

Now the text are not overlapping any longer nor are they clipped, but we still get them placed outside the parent StackPanel. This is because the rotation happens around the upper left corner and pushes the text out, as illustrated here:
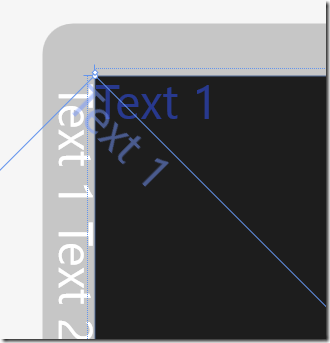
image

Luckily the fix is easy because the Arrange step allows us to specify where to place the element as well. We basically have to move the TextBlock over to the left by the height of the text, so instead of specifying (0,0) for the rectangle corner, we use (width,0), so our Arrange looks like this:

protected override Size ArrangeOverride(Size finalSize)
{
    if (m_Content != null)
    {
        m_Content.Arrange(new Rect(new Point(finalSize.Width, 0), new Size(finalSize.Height, finalSize.Width)));
        return finalSize;
    }
    else
        return base.ArrangeOverride(finalSize);
}

And our controls now flows correctly within the StackPanel:
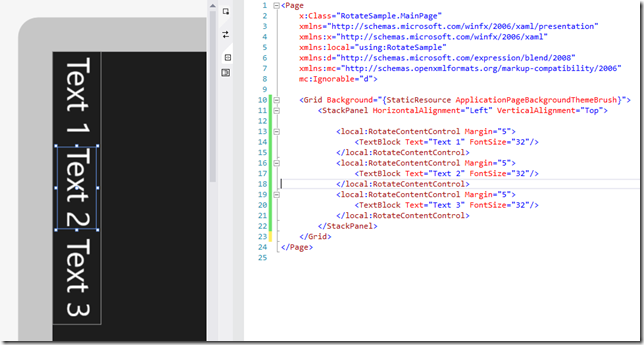
image

It also plays nice with other controls and respects alignments:
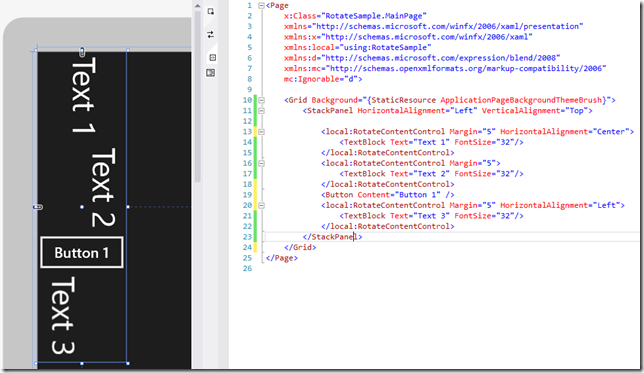
image

If you want to rotate the content –90 degrees, the offset in arrange changes slightly to:

m_Content.Arrange(new Rect(new Point(0, finalSize.Height), 
new Size(finalSize.Height, finalSize.Width)));

We could make this a property on our control, so you can easily change direction on the fly. We’ll add a new Direction enumeration and a DependencyProperty that triggers Arrange when it changes:

public RotateDirection Direction
{
    get { return (RotateDirection)GetValue(DirectionProperty); }
    set { SetValue(DirectionProperty, value); }
}

public static readonly DependencyProperty DirectionProperty =
    DependencyProperty.Register("Direction", typeof(RotateDirection),
typeof(RotateContentControl), new PropertyMetadata(RotateDirection.Down, OnDirectionPropertyChanged)); public static void OnDirectionPropertyChanged(DependencyObject d, DependencyPropertyChangedEventArgs e) { (d as RotateContentControl).InvalidateArrange(); //Trigger reflow }

We’ll also use remove the RenderTransform setting from OnApplyTemplate, and instead set it in ArrangeOverride, so that now looks like this:

protected override Size ArrangeOverride(Size finalSize)
{
    if (m_Content != null)
    {
        m_Content.RenderTransform = new RotateTransform() { Angle = (int)this.Direction };
        if (Direction == RotateDirection.Down)
            m_Content.Arrange(new Rect(new Point(finalSize.Width, 0), 
new Size(finalSize.Height, finalSize.Width))); else if (Direction == RotateDirection.Up) m_Content.Arrange(new Rect(new Point(0, finalSize.Height),
new Size(finalSize.Height, finalSize.Width))); return finalSize; } else return base.ArrangeOverride(finalSize); }

So here’s what that looks like in the designer:
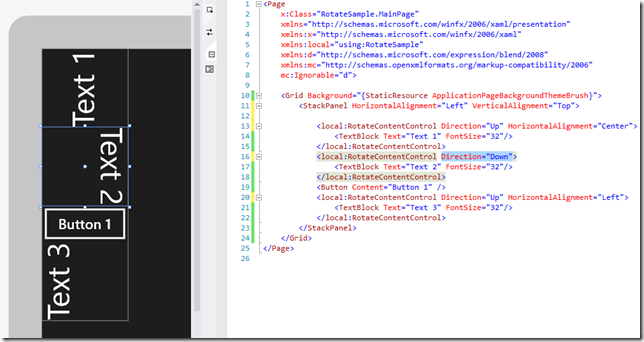
image

That’s it! Below is the entire source code including support for 0 and 180 degree rotations as well:

using Windows.Foundation;
using Windows.UI.Xaml;
using Windows.UI.Xaml.Controls;
using Windows.UI.Xaml.Media;

namespace RotateSample
{
    [Windows.UI.Xaml.Markup.ContentProperty(Name="Content")]
    public sealed class RotateContentControl : Control
    {
        private ContentControl m_Content;

        public RotateContentControl()
        {
            this.DefaultStyleKey = typeof(RotateContentControl);
        }

        protected override void OnApplyTemplate()
        {
            m_Content = GetTemplateChild("Content") as ContentControl;
            base.OnApplyTemplate();
        }

        protected override Windows.Foundation.Size MeasureOverride(Windows.Foundation.Size availableSize)
        {
            if (m_Content != null)
            {
                if (((int)Direction) % 180 == 90)
                {
                    m_Content.Measure(new Windows.Foundation.Size(availableSize.Height, availableSize.Width));
                    return new Size(m_Content.DesiredSize.Height, m_Content.DesiredSize.Width);
                }
                else
                {
                    m_Content.Measure(availableSize);
                    return m_Content.DesiredSize;
                }
            }
            else
                return base.MeasureOverride(availableSize);
        }

        protected override Size ArrangeOverride(Size finalSize)
        {
            if (m_Content != null)
            {
                m_Content.RenderTransform = new RotateTransform() { Angle = (int)this.Direction };
                if (Direction == RotateDirection.Up)
                    m_Content.Arrange(new Rect(new Point(0, finalSize.Height),
                                      new Size(finalSize.Height, finalSize.Width)));
                else if (Direction == RotateDirection.Down)
                    m_Content.Arrange(new Rect(new Point(finalSize.Width, 0), 
                                      new Size(finalSize.Height, finalSize.Width)));
                else if (Direction == RotateDirection.UpsideDown)
                    m_Content.Arrange(new Rect(new Point(finalSize.Width, finalSize.Height), finalSize));
                else
                    m_Content.Arrange(new Rect(new Point(), finalSize));
                return finalSize;
            }
            else
                return base.ArrangeOverride(finalSize);
        }


        public object Content
        {
            get { return (object)GetValue(ContentProperty); }
            set { SetValue(ContentProperty, value); }
        }

        public static readonly DependencyProperty ContentProperty =
            DependencyProperty.Register("Content", typeof(object), typeof(RotateContentControl), null);

        public enum RotateDirection : int
        {
            Normal = 0,
            Down = 90,
            UpsideDown = 180,
            Up = 270
        }

        public RotateDirection Direction
        {
            get { return (RotateDirection)GetValue(DirectionProperty); }
            set { SetValue(DirectionProperty, value); }
        }

        public static readonly DependencyProperty DirectionProperty =
            DependencyProperty.Register("Direction", typeof(RotateDirection),
            typeof(RotateContentControl), new PropertyMetadata(RotateDirection.Down, OnDirectionPropertyChanged));

        public static void OnDirectionPropertyChanged(DependencyObject d, DependencyPropertyChangedEventArgs e)
        {
            if(((int)e.OldValue) % 180 == ((int)e.NewValue) % 180)
                (d as RotateContentControl).InvalidateArrange(); //flipping 180 degrees only changes flow not size
            else
                (d as RotateContentControl).InvalidateMeasure(); //flipping 90 or 270 degrees changes size too, so remeasure
        }
    }
}

Note: While this article was written for Windows Store apps, these concepts apply directly to Silverlight, WPF and Windows Phone as well, albeit they already provide controls in the Toolkit (LayoutTransformer) to handle this.

Linking to Your Windows Store App

I just got my first app published in the Windows Store, and I wanted to create a direct link from the game homepage to the entry in the Windows Store. For this you can use the ms-windows-store protocol on your links, as described on msdn. To set it up, the first thing you’ll need to do is open up your project in Visual Studio, then open the Package.appxmanifest file. If your app has been associated with the Windows Store (this will happen the first time you create the publication package), the “Package family name” field should be populated under the “Packaging” tab:

image

Copy this package family name, and prefix it to “ms-windows-store:PDP?PFN=”

Example: ms-windows-store:PDP?PFN=57398MortenNielsen.Bao_9qs9wzj9xadrg

This should open my game up directly in the Windows Store App if you are on Windows 8 (and while you’re at it, please download it and throw it a good review – it’s free and goes for a good cause :-).

You can also link directly to the review page by adding REVIEW to the prefix.

Example: ms-windows-store:REVIEW?PFN=57398MortenNielsen.Bao_9qs9wzj9xadrg (and please leave a good review while you’re at it :-)

It’s also possible to link to a website that shows the same overview. This is nice if the user doesn’t have Windows 8 and you just want to tease them, or you prefer showing a webpage first in any case. However you won’t be able to get this link until the app has been published. Sign in to the App Store Developer Portal, click the “Details” link for your app listing, and scroll down. You’ll find a link under “Link to [APPNAME]",

image

Here’s the link as an example what the Windows Store Webpage looks like: http://apps.microsoft.com/webpdp/en-US/app/bao/dbe2f3a7-2deb-40d5-9a69-2995f14d6706
(and if you didn’t download the app yet, here’s your second chance :-)

You can also integrate your application into the IE10 Metro browser. Here’s what that looks like prior to installing the app:

image

And after install:

image

This would be a great experience if you offer both a website and a app version as well, allowing the user to quickly switch from one to the other. IE10 passes the url to your app so you can jump to a specific feature in your app, or you can add a third metatag with the arguments. You can read more about this feature here. Again you can try this experience at http://bao.win-rt.com (and this’ll be your 3rd chance to download my app :-).

Here’s the metatag you’ll need to add to the header:

<meta name="msApplication-ID" content="App"/>
<meta name="msApplication-PackageFamilyName" content="57398MortenNielsen.Bao_9qs9wzj9xadrg"/>.

The PackageFamilyName is the same, but the Application-ID you get by opening up the package.appmanifest in a text editor. Under the <Application> tag you’ll find the ID:

    <Applications>
        <Application Id="App" Executable="$target…

References:

The Windows Store Submission Process

I recently got access to the Windows Store, and submitted my first app, “The game of Bao”, a simple and fun board game I learned when we visited Malawi, Africa during our honeymoon (any money the game makes will be donated back to an organization working on improving the lives of the kids that taught us this game, so please be kind and play it a lot and give some great reviews :-).

I recorded the steps that I have had to go through so you can see what you need to have ready if you need to submit an app yourself.

*Note: Currently access to the Windows Store is limited to either companies and people who goes through an “App Excellence Lab”. Once your app gets the “seal of approval” from a Microsoft Engineer, you’ll get an invite code so you can create an account for the Windows Store.

When you sign into the windows store, the first thing you’re greeted with is the dashboard, where you can submit an app.

image

Clicking “Submit an app” brings you to a list of the steps you have to go through. You work your way through them from top to bottom (you can always go back and change stuff as long as you haven’t submitted yet):

image

First step is to give you application a name. This is a unique name, so if someone else already published an app with that name, you’ll have to come up with a different name. Also note the mention that your app’s manifest must have the exact same DisplayName set. You can also reserve your app name this way, and later finish the app submission process when your app is ready.image

The next step is the selling details. There’s quite a lot to fill out here, but still pretty straightforward:

image

The next page allows you to configure in-app purchase (you can add as many as you want, ranging from $1.49 up to $999.99):

image

The next step is the age rating. Make sure you read the “small” print. If your app has access to the internet, chances are you can’t go with the lowest rating, no matter how PG your app is. Also note that for some countries a rating certificate is required to be able to publish there (I have no clue how to get these though):

image

Next step is declaring whether your app uses any form of cryptography (there’s a lot of export restrictions on that technology). You either say yes or no. If you pick yes, you’ll be asked a few more questions about this:

image

Next step is to upload your app package. In Visual Studio, select “Project –> Store –> Create App Packages…”

image

Pick for Windows Store.

image

You’ll then be asked to sign in. It’ll find the app name you reserved in the first step and then generate the .appxupload package that you’ll need in the next step:

image

Next is the app description. You’ll need 1-8 screenshots (1366x768), Promotional Images (846x468,558x756,414x468,414x80) keywords, app features, Description, web-link to Privacy Policy (if you have internet-enabled your app), description of all in-app purchace options to name a few.

image

Last step is to optionally include some notes to the testers:

image

When you’re done, you should be back at the overview page with all check-marks:

image

Either review your data, or hit “Submit for certification”. All you can do now is sit back and wait for the app to go through. There’s an estimate listed of how long each step usually takes.

image

Running a Storyboard as a Task

Sometimes you have some code that needs to run after a storyboard has completed. In my case I'm working on a little board game, and after each move (which I animate using a Storyboard), I need to figure out the next move, and either start a new play-animation or pass the turn to the other player.

Therefore I run in a loop until the turn is over. You can detect when a storyboard has finished when the "Completed" event triggers, but that makes for some recursive spaghetti code. It's much easier if I could just "await" the storyboard using a task. So I created the little extension method below that makes this possible. All you have to do to start and wait for the storyboard to finish is:

    await myStoryboard.BeginAsync();

Below is the little extension method (which also serves as a general example on how you turn an event-based class into an awaitable Task using the TaskCompletionSource):

using System;
using System.Threading.Tasks;
using Windows.UI.Xaml.Media.Animation;

namespace SharpGIS
{
    public static class StoryboardExtensions
    {
        public static Task BeginAsync(this Storyboard storyboard)
        {
            System.Threading.Tasks.TaskCompletionSource<bool> tcs = new TaskCompletionSource<bool>();
            if (storyboard == null)
                tcs.SetException(new ArgumentNullException());
            else
            {
                EventHandler<object> onComplete = null;
                onComplete = (s, e) => {
                    storyboard.Completed -= onComplete; 
                    tcs.SetResult(true); 
                };
                storyboard.Completed += onComplete;
                storyboard.Begin();
            }
            return tcs.Task;
        }
    }
}

Note: This code is written for WinRT. If you want to use this for Silverlight or WPF, just change ‘Eventhandler<object>’ to ‘EventHandler’.

Code snippet for reading files in a Windows Store App

Here’s a little useful code snippet for opening up a file stream from either you local data store, or from the application folder in a Windows Store/WinRT/Metro/[insert name of the day] app:

using System;
using System.IO;
using System.Threading.Tasks;
using Windows.Storage;
using Windows.Storage.Streams;
using System.Runtime.InteropServices.WindowsRuntime;
//[...]
public static async Task<Stream> ReadFile(string filename)
{
    StorageFolder folder = null;
    if (filename.StartsWith("ms-appx:///"))
    {
        filename = filename.Substring(11);
        folder = Windows.ApplicationModel.Package.Current.InstalledLocation;
    }
    else
    {
        folder = Windows.Storage.ApplicationData.Current.LocalFolder;
    }
    while (filename.Contains("/"))
    {
        var foldername = filename.Substring(0, filename.IndexOf('/'));
        filename = filename.Substring(foldername.Length + 1);
        folder = await folder.GetFolderAsync(foldername).AsTask().ConfigureAwait(false);
    }
    var file = await folder.GetFileAsync(filename);
    IInputStream stream = await file.OpenReadAsync();
    DataReader reader = new DataReader(stream);
    return await file.OpenStreamForReadAsync();
}

This allows you to get access to a stream from your application. Ie. if you have a file called “About.txt” in your project inside the folder “Assets” (remember to set build action to ‘content’), you would access it like this:

using (var stream = await ReadFile("ms-appx:///Assets/About.txt"))
{
    //TODO
}

Note that the ms-appx:/// is the standard prefix for a uri to files within the application folder. If you want to get access to a file in your app data folder, just leave this off.