Hacking the Silverlight Unit Tests to support returning Task

The Silverlight/Windows Phone unit test framework has always supported running asynchronous tests – a feature that until recently wasn’t there in WPF without jumping some really ugly (and flaky) hoops. Basically you can write a silverlight and windows phone unit test like this:

[TestClass]
public class TestClass1 : SilverlightTest
{
    [TestMethod]
    [Asynchronous] 
public void Test1() { DispatcherTimer timer = new DispatcherTimer() { Interval = TimeSpan.FromSeconds(2) }; timer.Tick += (a, b) => { timer.Stop(); base.TestComplete(); }; timer.Start(); } }

The problem with this code though is that this is only for Silverlight and Windows Phone. If you are cross-compiling for multiple platforms and want to run on WPF this wouldn’t work. It’s also not pretty that you have to inherit from SilverlightTest, remember to decorate the class with [Asynchronous] as well as calling TestComplete. Even worse, if you forget to stop the timer, it would CRASH the entire test run. The unit test framework is a little flaky when it comes to a task accidentally completing twice (instead of reporting it as an error, it crashes the entire test run and you’ll never get your daily test report…).

With Visual Studio 2012 and .NET 4.5 we can now simply return an object of type ‘Task’ and we would be good to go. This is awesome for testing your new async/await based stuff that returns task. So in WPF you would simply return your task object. As an example, let’s say we have the following really advanced computing task:

public static Task<int> Compute(int input)
{
    TaskCompletionSource<int> tcs = new TaskCompletionSource<int>();
    DispatcherTimer timer = new DispatcherTimer() { Interval = TimeSpan.FromSeconds(2) };
    timer.Tick += (a, b) =>
    {
        timer.Stop();
        if (input <= 0)
            tcs.SetException(new ArgumentOutOfRangeException("Number must be greater than 0"));
        else 
            tcs.SetResult(input);
    };
    timer.Start();
    return tcs.Task;
}

Now to test this in .NET 4.5 (including Windows Store Apps) you can simply write the following unit test:

[TestClass] 
public class TestClass1
{
[TestMethod] public async Task Test42() { var result = await Utility.Compute(42); Assert.AreEqual(result, 42); }
}

Nice and simple. However in Silverlight and Windows Phone you would have to write the following instead (I highlighted the extra or changed code required):

[TestClass]
public class TestClass1 : SilverlightTest
{
    [TestMethod]
    [Asynchronous]
    public async void Test42()
    {
        var result = await Utility.Compute(42);
        Assert.AreEqual(result, 42);
        base.TestComplete();
    }
}

Wouldn’t it be nice if the unit test I just wrote for WPF would work as is in Silverlight and on Windows Phone? Of course you could create a SilverlightTest class that has an empty TestComplete method, define an AsynchronousAttribute just for fun, and sprinkle a compiler conditional around the void/Task return type, but that just feels messy to me.

Fortunately the unit test framework for Silverlight is open source, so it’s possible to hack it in there. There are two main places you will need to change, which I will go through here. Note this is based on changeset #80285.

In the file “\Microsoft.Silverlight.Testing\UnitTesting\UnitTestMethodContainer.cs” we add the highlighted code to the method that detects if the Asynchronous attribute is on a method:

private bool SupportsWorkItemQueue()
{
    if (_testMethod != null)
    {
        if (_testMethod.Method.ReturnType != null && 
            _testMethod.Method.ReturnType == typeof(System.Threading.Tasks.Task) ||
            _testMethod.Method.ReturnType.IsSubclassOf(typeof(System.Threading.Tasks.Task)))
            return true; //Task Support
        else
            return ReflectionUtility.HasAttribute(_testMethod, typeof(AsynchronousAttribute));
    }
    else if (MethodInfo != null)
    {
        return ReflectionUtility.HasAttribute(MethodInfo, typeof(AsynchronousAttribute));
    }
    else
    {
        return false;
    }
}

Next is modifying the Invoke method that executes your test, which is located in ‘Microsoft.Silverlight.Testing\Metadata\VisualStudio\TestMethod.cs’. This is where the main work is done to enable tasks to work:

public virtual void Invoke(object instance)
{
    _methodInfo.Invoke(instance, None);
}

This now changes to:

public virtual void Invoke(object instance, CompositeWorkItem workItem)
{
    var t = _methodInfo.Invoke(instance, None) as System.Threading.Tasks.Task;
    if (t != null)
    {
        if (t.IsFaulted)
        {
            throw t.Exception;
        }
        else if (!t.IsCompleted)
        {
            var context = System.Threading.SynchronizationContext.Current;
            t.ContinueWith(result =>
            {
                context.Post((d) =>
                {
                    if (result.IsFaulted)
                    {
                        Exception ex = result.Exception;
                        if (ex is AggregateException)
                            ex = ex.GetBaseException();
                        workItem.WorkItemException(ex);
                    }
                    else
                        workItem.WorkItemCompleteInternal();
                }, null);
            });
        }
    }
}

Basically it grabs the task that is returned and calls the code that TestComplete would have called or what a raised exception would have called in case the test raises an exception. Also note that we changed the signature of the method to give us the CompositeWorkItem we need to raise these events on. This change does affect quite a lot of other code, but it’s merely a matter of adding the same parameter there as well, and the only place that calls this method (which is the CompositeWorkItem) to set this parameter to ‘this’.

Now you can also write tests that tests for exceptions thrown. Often you don’t even need to await the result in those cases:

[TestMethod]
[ExpectedException(typeof(ArgumentOutOfRangeException))]
public Task TestOutOfRange()
{
    return Utility.Compute(0);  //no need to await
}

[TestMethod]
public Task TestOutOfRange_Failure() //This test will fail
{
    return Utility.Compute(0);
}

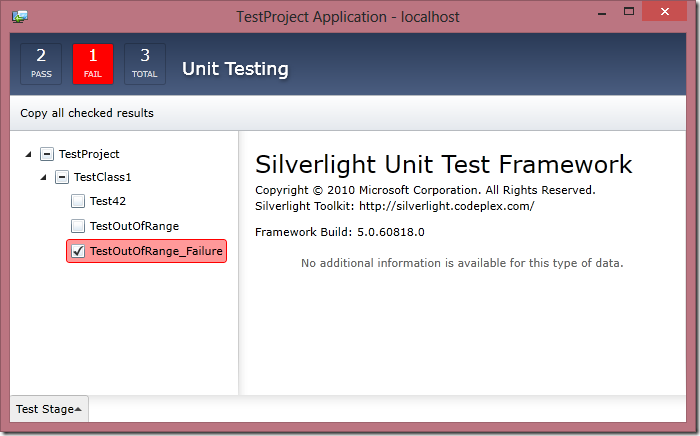
And here’s what that looks like for the entire test run:
image

To make it easy on you, you can download the modified unit test framework source here.

…But EVEN better: Go vote for this to be part of the official toolkit here:  http://silverlight.codeplex.com/workitem/11457

WinRT vs. Silverlight - Part 8 - What other people are blogging

See intro blogpost here.

Over the last few months several other people have been writing blog posts covering the transition from WPF/Silverlight/WP7 to WinRT. Below are some of the ones I’ve stumbled upon.

Colin Eberhardt - XAMLFinance - A Cross-platform WPF, Silverlight and WP7 Application
An app that reuses code across 3 different XAML platforms and compiles for all of them. A great example that this can be accomplished. Also make sure to check out Colin’s blog for more WinRT goodness.

Jeffrey Richter - Core .NET Type usable from a Metro Styl Application
A list of the “standard” .NET types that are available in WinRT as well.

Andy’s blog - Physics Games: Multi-targeting Windows 8 and Windows Phone 7
Andy goes through building a physics-based game for both Windows 8 and Windows Phone 7. Also check out his Physics Helper library for WinRT.

Tim Greenfield - “WinRT Genome Project”
Visual comparison of how much overlay Silverlight 5 and WinRT has.

Tim Greenfield - Silverlight 5 vs. WinRT comparison
A follow-up to the link above with a comparison of namespaces, members, types and differences between SL5 and WinRT. This is an amazing list if you want to get into the details when reusing code between the two frameworks.

Pontus Wittenmarks’s - 10 tips about porting Silverlight apps to WinRT/Metro style apps (Part 1)
A quick list of of tips when porting from Silverlight to WinRT.

Petzold Book Blog - Windows 8 Dependency Property Strangeness
Talks about some of the issues with Dependency Properties in Windows 8. I already briefly touched on this, but this goes a lot more in-depth.

If I find more, I’ll add them here, or feel free to mention any other good resources in the comments below.

WinRT vs. Silverlight - Part 7 - Making WebRequests

See intro blogpost here.

In Silverlight and WPF you are probably used to using WebClient to perform downloads. This is a simple class for doing download/upload string or retrieving a response stream from the server. However, in Windows Runtime this client doesn’t exists. Instead we have new a simple “HttpClient” to do much of what WebClient can. However it works very differently by using the new Task framework, and the more you dive into porting code to WinRT, you will see this a lot, and it will make your life porting code cumbersome. On the upside, the Tasks framework is awesome and it’ll often simplify you code a great deal! I talked a bit about this in my previous post, so please read that first, before you continue here, since this will be building on top of that.

Let’s say we have a method in WPF and Silverlight that uses WebClient to downloada and create an image. Since this is working asynchronously, we would have to either use event handlers or action delegates to return the result and/or the error. The method could look something like this:

public void GetContent(Uri uri, Action<string> complete, Action<Exception> error)
{
    WebClient client = new WebClient();
    client.DownloadStringCompleted += (sender, e) =>
    {
        if (e.Error != null)
            error(e.Error);
        else {
            complete(e.Result);
        }
    };
    client.DownloadStringAsync(uri);
}


Here’s how a method like that could look in WinRT:

public async Task<string> GetContentI(Uri uri)
{
   System.Net.Http.HttpClient client = new System.Net.Http.HttpClient();
   var result = await client.GetAsync(uri);
   return result.Content.ReadAsString();
}

Simple right? Well it' gets even simpler when we have to start consuming that method.

From SL and WPF you would consume the method something like this:

GetContent(uri, (text) => {
          TextBlock tb = new TextBlock() { Source = text };
          LayoutRoot.Children.Add(tb);
      },
      (error) => { /*TODO: handle error*/ }
);

And the same using the Task framework:

try {
   TextBlock tb = new TextBlock() { Source = await GetContent(uri) };
   LayoutRoot.Children.Add(tb);
catch { /*TODO: handle error */ }

You tell me what’s more elegant and readable? Smile

My point here is that Tasks are awesome, so rather than trying to reuse your existing code in WinRT, consider rewriting your existing code to use Tasks and it will work much smoother.

There’s lets create a method for downloading a string over the network that works the same way across the board. (I’ll assume you are using the Async Task CTP for Silverlight or WPF for this).

public async Task<string> GetContent(Uri uri)
{
#if NETFX_CORE
    System.Net.Http.HttpClient client = new System.Net.Http.HttpClient();
    var reqResult = await client.GetAsync(uri);
    return reqResult.Content.ReadAsString();
#else
    WebClient client = new WebClient();
    TaskCompletionSource<string> tcs = new TaskCompletionSource<string>();
    client.DownloadStringCompleted += (sender, e) =>
    {
        if (e.Error != null)
            tcs.TrySetException(e.Error);
        else
            tcs.TrySetResult(e.Result);
    };
    client.DownloadStringAsync(uri);
    return await tcs.Task;
#endif
}

Note you could also use the new .NET method “WebClient.DownloadStringTaskAsync” which would simplify the above quite a lot. I used the event based approach to demonstrate how you would handle the cases where you don’t already have a task implementation available.

WinRT vs. Silverlight - Part 5 - Defining default style template

See intro blogpost here.

Here's something that's actually NOT different in Silverlight (but it's different from WPF as it has always been).
You declare your style using DefaultStyleKey. This means the code looks like this for Silverlight, WPF and Windows Runtime:

public class MyControl : Control
{
    public MyControl()
    {
#if SILVERLIGHT || NETFX_CORE
        this.DefaultStyleKey = typeof(MyControl);
#endif
    }
    static MyControl() {
#if !SILVERLIGHT && !NETFX_CORE
        DefaultStyleKeyProperty.OverrideMetadata(
            typeof(HoverControl),
            new FrameworkPropertyMetadata(
            typeof(HoverControl))); 
#endif
    }
}

Here is what IS different though: You need to set the build action of \Themes\Generic.xaml to "Content". It won't work without it.
Also note that when you add Generic.xaml to your project, it will also get added to App.Xaml. I assume this is a bug in the current release, but you will have to go and delete this entry, or it won't work.

WinRT vs. Silverlight - Part 4 - Dispatcher

See intro blogpost here.

In Silverlight and WPF you will often use the Dispatcher to return from a background thread to jump to the UI Thread. This is required when you need to update your UI, because you’re not allowed to touch the UI from anything but the UI Thread. The Dispatcher method has changed slightly in WinRT. It’s also now of type “CoreDispatcher”, instead of just “Dispatcher”.

#if !NETFX_CORE
  Dispatcher.BeginInvoke(
#else
  Dispatcher.Invoke(CoreDispatcherPriority.Normal, 
#endif
           (s, a) => { ... }
#if NETFX_CORE
      , this, null);
#endif
   );

WinRT vs. Silverlight - Part 3 - Dependency Properties

See intro blogpost here.

UPDATE Feb. 29, 2012: As hinted at below that this would happen, this blogpost on dependency properties is now outdated. Since the Consumer Preview of Windows 8 released, dependency properties now work exactly like they do in Silverlight and WPF.

---

Declaration of dependency properties has changed in the WinRT. This is a temporary change and will go away when WinRT hits beta, but still good to know if you start prototyping on WinRT today. If you are a control developer this is probably one of the things you would have to change in the most places.

Here’s what the API looks like for Silverlight and WPF for registering a Dependency Property or an Attached Property:

public static DependencyProperty Register(
      string name, 
      Type propertyType, 
      Type ownerType,
      PropertyMetadata typeMetadata);
public static DependencyProperty RegisterAttached(
      string name, 
      Type propertyType,
      Type ownerType, 
      PropertyMetadata defaultMetadata);

And here’s what this currently looks like in WinRT CTP :

public static DependencyProperty Register(
      string name, 
      string propertyTypeName, 
      string ownerTypeName,
      PropertyMetadata typeMetadata);
public static DependencyProperty RegisterAttached(
      string name, 
      string propertyTypeName,
      string ownerTypeName, 
      PropertyMetadata defaultMetadata);

Notice how the PropertyType and PropertyOwnerType is now strings instead of types!

This means you would have to write your code like this to make it cross-compile:

        public double MyDoubleProperty
        {
            get { return (double)GetValue(MyDoublePropertyProperty); }
            set { SetValue(MyDoublePropertyProperty, value); }
        }

        public static readonly DependencyProperty MyDoublePropertyProperty =
            DependencyProperty.Register("MyDoubleProperty", 
#if NETFX_CORE
             "Double", "MyNamespace.MyControl", 
#else
                typeof(double), typeof(MyNamespace.MyControl), 
#endif
                 new PropertyMetadata(0d));

Also note that you don’t use the full type name for the system types. Ie. here you use “Double” and not “double” or “System.Double”.

You could create a few static methods to replace the Register/RegisterAttached methods that will make your code cross-platform, and switch it out just there when this changes. Here’s one example how this could be accomplished (the ‘ToRTString’ method isn’t fully tested though…):

    public static DependencyProperty RegisterAttached(string name, Type propertyType, Type ownerType, PropertyMetadata metadata)
    {
        return DependencyProperty.RegisterAttached(name, 
#if NETFX_CORE
            propertyType.ToRTString(), ownerType.ToRTString()
#else
            propertyType, ownerType
#endif
            , metadata);
    }
    public static DependencyProperty Register(string name, Type propertyType, Type ownerType, PropertyMetadata metadata)
    {
        return DependencyProperty.Register(name,
#if NETFX_CORE
            propertyType.ToRTString(), ownerType.ToRTString()
#else
            propertyType, ownerType
#endif
            , metadata);
    }
#if NETFX_CORE
    private static string ToRTString(this Type type)
    {
        string name = type.FullName;
        if(name.StartsWith("System."))
            return name.Substring(7);
        else
            return name;
    }
#endif

WinRT vs. Silverlight - Part 2 - Code Namespace

See intro blogpost here.

The namespaces in WinRT has changed for all the UI related classes. Generally System.Windows has been replaced with Windows.UI.Xaml, and the rest is the same below that. If we to use the “NETFX_CORE” compiler directive that WinRT projects comes with, the typical default using statements that would compile on both Silverlight, WPF and WinRT would look like this:

using System;
using System.Collections.Generic;
using System.Linq;
using System.Text;
using System.Threading.Tasks;
#if !NETFX_CORE
using System.Windows;
using System.Windows.Controls;
using System.Windows.Data;
using System.Windows.Documents;
using System.Windows.Input;
using System.Windows.Media;
using System.Windows.Media.Imaging;
using System.Windows.Navigation;
using System.Windows.Shapes;
#else
using Windows.UI.Xaml;
using Windows.UI.Xaml.Controls;
using Windows.UI.Xaml.Data;
using Windows.UI.Xaml.Documents;
using Windows.UI.Xaml.Input;
using Windows.UI.Xaml.Media;
using Windows.UI.Xaml.Media.Imaging;
using Windows.UI.Xaml.Navigation;
using Windows.UI.Xaml.Shapes;
#endif

This is also described in greater detail here: http://msdn.microsoft.com/en-us/library/windows/apps/hh465136(v=VS.85).aspx

WinRT vs. Silverlight - Part 1 - XML Namespace

See intro blogpost here.

For the most part your XAML ports right over to WinRT. However an important change is how you register namespaces from your assemblies.

Here's how you do this in Silverlight and WPF for an assembly "MyAssembly.dll" and namespace MyAssembly.MyNamespace:

    xmlns:local="clr-namespace:MyAssembly.MyNamespace;assembly:MyAssembly"

And similar for namespaces in the same assembly as where the XAML file lives (ie MyAssembly):

    xmlns:local="clr-namespace:MyAssembly.MyNamespace"

In WinRT, you only declare the namespace (never the assembly) and instead use "using" instead of "clr-namespace":

    xmlns:local="using:MyAssembly.MyNamespace"

Unfortunately we don't have #if-def statements in XAML so you can just use compiler directives on your XAML and make it work on both platforms. So until we get that (or Microsoft reverts the above change) you are going to have to duplicate and maintain two sets of XAML. :-(

I actually do like this change, and this is probably how it should always have been, but it's a change that cause a lot of pain for developers trying to reuse their existing codebase. The benefit doesn't seem to pain (from what I understand the Windows team simply didn't like it said "clr" in there, plus they don't have the exact same concepts down in the runtime so the assembly part was left out.)

WinRT vs. Silverlight - Part 0

I recently wrote a blog post series on how to share your code between Silverlight and WPF.

With the announcements of Windows 8 at the //BUILD/ conference and the new Windows Runtime (WinRT) which can be built against using C# and XAML I thought it appropriate to start a new series on how to make your existing Silverlight/WPF code run on WinRT. I'm mostly writing this as notes to myself and hope you will also find them useful. Personally I've already found a lot of issues with porting code over. Not that there are significant changes, but the documentation is very limited at this point, and the gotchas enough to make you waste a lot of time on resolving this. Hopefully this will act as a resource to get it working for you as well. Keep an eye on this post. I'll post new links as I go along learning new things about WinRT.

Generally what I have found is that with respect to XAML WinRT is more compatible to Silverlight than WPF, so expect it easier to use your Silverlight knowledge, and don't try and use WPF XAML features at this point. Things like DataTriggers etc. are not supported, and for the most part, the UI related methods in code are more similar to Silverlight than .NET 4 (note however that non-UI code is closer to the "original" .NET, since this is essentially the same CLR and compiler used).

I won't go into too much detail about what this means for Silverlight and WPF. There's plenty of blogs and newssites that has their (over?)reactions described in detail. This series will really just focus on how to take your existing code and get it running on WinRT.

Click to select a topic below:

  1. WinRT vs. Silverlight - Part 1 - XML Namespace
  2. WinRT vs. Silverlight - Part 2 - Code Namespace
  3. WinRT vs. Silverlight - Part 3 - Dependency Properties
  4. WinRT vs. Silverlight - Part 4 - Dispatcher
  5. WinRT vs. Silverlight - Part 5 - Defining default style template
  6. WinRT vs. Silverlight - Part 6 - Using Tasks
  7. WinRT vs. Silverlight - Part 7 - Making WebRequests 
  8. WinRT vs. Silverlight - Part 8 - What other people are blogging
  9. Coming… WinRT vs. Silverlight - Part 9 - File IO
  10. Coming… WinRT vs. Silverlight - Part 10 – Various CTP bugs…
  11. More…

WPF vs. Silverlight - Part 11 - Silverlight on Phone vs. Browser

See intro blogpost here.

Well technically this is not a WPF vs Silverlight post, but a SL vs WP7, but it still kinda belongs in this series.

Generally the differences in the API’s between Browser Silverlight and Windows Phone Silverlight are pretty slim. However dealing with the phone can be quite different anyway. First there’s often less security restrictions on the phone to worry about. Secondly there’s a lot of phone specific APIs like sensor data, camera, contacts etc). The screen is also smaller so often some controls doesn’t make sense to have on the phone, or needs to have a separate layout to enhance the experience on this small touch-centric screen. Lastly (and very importantly) the small amount of memory, processing power and battery life means that performance is a concern. This often forces you to go down a slightly different avenue for your application, and for certain custom controls.

For the API differences I’m again going to be cheap and just point you to the main resource on MSDN that has some really good info on that matter:

Other notable things:

  • In Silverlight for Windows Phone, effects such as Blur and DropShadow are not supported.
  • Custom pixel shaders are not supported, so the PixelShader type is not supported.
  • Silverlight applications on Windows Phone are hosted on the client device and do not run inside of a browser. Silverlight features that are based on a browser host are not supported. These features include the HTML DOM bridge, JavaScript programmability, and the Silverlight plug-in object reference.
  • Isolated storage on Windows Phone does not enforce quotas to restrict the size of isolated storage for Silverlight-based applications. The default quota size of 1 MB does not apply. (however there’s still a 2Gb limit on Isolated Storage for WP7, or less if you run out of space).
  • Manipulation events that Silverlight doesn’t have (well technically they are there but throw a not supported exception), are the same as in WPF, so WP7 has better touch closer to WPF than Silverlight.

Next: WPF vs. Silverlight - Part 11– Silverlight on Phone vs. Browser