Building an ARM64 Windows Universal App

If you read the recently release documentation on Windows 10 on ARM, you get the impression you can only build x86 and ARM 32bit applications.

However it is completely possible today to build and run a native ARM64 UWP application as long as you use C++ (.NET isn’t - at this point at least - supported). I’ll detail the steps below:

First we need to ensure you have the ARM64 C++ compiler pieces installed. Open the Visual Studio installer and ensure the ARM64 components are installed:

image

Next we create a new UWP C++ Application:

image

Open the configuration manager, and select a new solution platform:

ConfigManager

Pick ARM64:

ConfigManager2

In the project properties you can now also see that the Target Machine is set to MachineARM64:

ProjectProperties

Now all you have to do is compile the app. Or well… maybe not!

BuildError

This build error occurs due to a but in the .targets file, ARM64 isn’t really fully supported yet, and some of the build settings isn’t expecting ARM64. Luckily it’s hitting a part that isn’t needed, so we can trick MSBuild to skip over this.

Open your .vcxproj project file and add the following fake property:

<ProjectNTagets>Some silly value here </ProjectNTagets>

ProjectFix

And Voila! Your project should now compile:

BuildSuccess

Next we can create a new app package. ARM64 should now show up in the list, and you can check that on as well, to generate a package that runs natively on any architecture Windows ships on:

CreatePackageDialog

Success!

PackageCreationComplete

That’s all there is to it!

Now next is to get hold of an ARM64 device and figure out how to deploy and debug this. Once I have a device, I’ll post the next blog…

First release of WindowsStateTriggers

With the release of the Windows 10 Universal SDK today I’ve updated the Github Repository for the WindowsStateTriggers for the final SDK. Go grab the source code today!

During the beta period I’ve received several great fixes and additions from the community. Thank you all who contributed!

The Nuget package is available here: https://www.nuget.org/packages/WindowsStateTriggers

Get full source here: https://github.com/dotMorten/WindowsStateTriggers


See the WIKI or Test App for usage some usage examples.

Create a Universal 3D App in a matter of minutes

We just released version 10.2.6 of 'ArcGIS Runtime for .NET SDK', which now supports 3D and KML files on both Windows Store 8.1, Windows Phone 8.1 and WPF. This means you can now quickly build 3D applications that supports all these platforms. We also released the package on NuGet for your convenience.

As a demonstration how quick it is to create a Windows Phone and Windows Store 3D app, here's a little video creating a universal 3D app from scratch in a couple of minutes:

Displaying a backbutton on your app title bar

Disclaimer: This article is written based on Windows 10 Tech Preview – Build 10122. Things might change completely in the future.

Some of the Windows 10 apps have a back button at the top of the app bar. Here’s an example in the Settings Control Panel:

image

We can add this to our own apps but using the SystemNavigationManager’s AppViewBackButtonVisibility.

Here’s how that will look like:

SystemNavigationManager.GetForCurrentView().AppViewBackButtonVisibility = AppViewBackButtonVisibility.Visible;

When you run this code you’ll now also see the exact same back button in your Windows UWP Desktop app! No need to waste precious screen real-estate when there’s room on the top bar.

Of course for Windows Phone this isn’t really needed (although nothing seems to happen if you call this API), call it anyway, just in case you're running on a device that can show the backbutton - it seems like it just doesn't show on devices with hardware:


   //Show UI back button - do it on each page navigation
   if (Frame.CanGoBack)
      SystemNavigationManager.GetForCurrentView().AppViewBackButtonVisibility = AppViewBackButtonVisibility.Visible;
   else
      SystemNavigationManager.GetForCurrentView().AppViewBackButtonVisibility = AppViewBackButtonVisibility.Collapsed;


   //Hook up back buttons - Do this just once - ie on app launched
   SystemNavigationManager.GetForCurrentView().BackRequested += (s, e) =>
   {
       if (Frame.CanGoBack)
           Frame.GoBack();
   };
   if (Windows.Foundation.Metadata.ApiInformation.IsTypePresent("Windows.Phone.UI.Input.HardwareButtons"))
   {
       //Also use hardware back button
       Windows.Phone.UI.Input.HardwareButtons.BackPressed += (s, e) =>
       {
           if (Frame.CanGoBack)
           {
               e.Handled = true;
               Frame.GoBack();
           }
       };
   }

Now you get back button support in both desktop and phone apps when you can navigate back!

Unfortunately the BackRequested and BackPressed event arguments are different, so you can’t reuse the same event handler for both. That’s quite a shame – I hope Microsoft will be cleaning that up soon.

Creating DeviceFamily specific layouts in a Universal App

Disclaimer: This article is written based on Windows 10 Tech Preview – Build 10041. Things might change completely in the future.

In an earlier post, I showed how to use a StateTrigger to adapt parts of your UI to a specific device family (Device families are: Windows Desktop, Windows Mobile, XBox, IoT etc).

However if you want to do major differences in your UI, that’s probably not the most efficient way. Windows 10 comes with a nice trick to use completely different XAML files based on the device family you’re running on.

Let’s first create a new blank UAP project, and add the following XAML to the main <Grid> on MainPage.xaml

<Grid Background="{ThemeResource ApplicationPageBackgroundThemeBrush}">
 
    <TextBlock Text="Hello Windows Desktop"
                HorizontalAlignment="Center"
                VerticalAlignment="Center"
                />        
 
</Grid>


When you run this on Desktop,you not surprisingly get this:

image

And also not surprising you get this on Windows Phone:

image

Now what we want to do is override the MainPage.xaml for Windows Phone and display a more correct message.

First create a new folder called DeviceFamily-[family] where [family] is ‘Mobile’:

image

Right-click this folder and choose “Add new item”

image

Pick “Xaml View” and change the name to “MainPage.xaml” This page is similar to a blank page; but is for overriding specific XAML pages – ie it doesn’t include the code behind, which you already have.

Now add the new TextBlock to this page with a more device family specific message:

<Grid Background="{ThemeResource ApplicationPageBackgroundThemeBrush}">
 
    <TextBlock Text="Hello Windows Phone" 
                HorizontalAlignment="Center"
                VerticalAlignment="Center" />
        
</Grid>

Because this XAML file ii in the DeviceFamily-Mobile, when running on Windows mobile, this XAML will be used instead of the default MainPage.xaml defined in the root of the project

image

So this method enables you to completely override the UI and adapt for the device family and maintain the same code-behind.

Using Windows 10’s Extended Execution

Disclaimer: This article is written based on Windows 10 Tech Preview – Build 10041. Things might change completely in the future.

On Windows Phone Silverlight 8.0 it was possible to continue run an while the app wasn’t foregrounded. This was useful for Turn-by-turn or run-tracker type of apps. So even if you got a phone call or turned the screen off, the app would continue to run. Unfortunately that functionality was removed (well not removed, but rejected in certification) from Windows Phone Silverlight 8.1, and it was never added to Windows Runtime apps. That meant you were pretty much stuck on Silverlight 8.0 if you were building any of these apps.

However, in Windows 10 the functionality is finally here with the Windows Runtime! There’s not a lot of doc on it, and especially on phone it seems rather buggy, but I’ll try and explain the gist of it here.

First let’s create a new app, and add some basic location tracking to it.

private Geolocator locator;
private ObservableCollection<string> coordinates = new ObservableCollection<string>();
public MainPage()
{
    this.InitializeComponent();
    locator = new Geolocator();
    locator.DesiredAccuracy = PositionAccuracy.High;
    locator.DesiredAccuracyInMeters = 0;
    locator.MovementThreshold = 0;
    locator.PositionChanged += Locator_PositionChanged;
    coords.ItemsSource = coordinates;
}
 
private void Locator_PositionChanged(Geolocator sender, PositionChangedEventArgs args)
{
    var coord = args.Position;
    string position = string.Format("{0},{1}",
        args.Position.Coordinate.Point.Position.Latitude, //yeah it's this deep! Surprised smile
        args.Position.Coordinate.Point.Position.Longitude);
    var _ = Dispatcher.RunAsync(CoreDispatcherPriority.Normal, () =>
    {
        coordinates.Insert(0, position);
    });
}

And add the following ListView to the main page:

<ListView x:Name="coords" />

When you run this app, you’ll start seeing coordinates getting added to the list about once every second.

Now if you were to minimize the app (if you run as a desktop app – not a phone app), and return to the app, you might notice that the app still got coordinates added while it was minimized. That’s probably because you had the debugger attached. Try running the app without Visual Studio debugging, and you’ll notice the app will completely pause when it’s minimized. That means the app will stop tracking you if it’s not active. So first lesson: The Visual Studio debugger lies to you and prevents the app from suspending.

If we want to continue running the app while another app is active (or on a phone get an unexpected phone call), we now have a new “Extended Execution” session that we can start.

private ExtendedExecutionSession session;
 
private async void StartLocationExtensionSession()
{
   session = new ExtendedExecutionSession();
   session.Description = "Location Tracker";
   session.Reason = ExtendedExecutionReason.LocationTracking;
   session.Revoked += ExtendedExecutionSession_Revoked;
   var result = await session.RequestExtensionAsync();
   if (result == ExtendedExecutionResult.Denied)
   {
       //TODO: handle denied
   }
}

This tells the app that we’d like to continue even if the app is backgrounded. So you would usually call this API when you start running or doing your route.

Similarly we can stop the execution by disposing the session:

if (session != null)
{
    session.Dispose();
    session = null;
}

You would typically call this at the end of the run or when you reach your destination.

The only piece we’re missing is the Revoked event – I’m not entirely sure when this fires (there’s no documentation available yet), but on the Windows Phone emulator it fires the moment you leave the app, so I haven’t been able to get this working there.

private void ExtendedExecutionSession_Revoked(ExtendedExecutionSession sender, ExtensionRevokedEventArgs args)
{
    //TODO: clean up session data
    StopLocationExtensionSession();
}

Now add this to your app and call the StartLocationExtensionSession method and minimize your app. Wait a little and come back to it – note that points have been collected while the app wasn’t active. So now you can go write your run tracker app for Windows Desktop and take your desktop computer for a run… or wait for a Windows Phone 10 build where it’s working Smile

Using Custom Visual State Triggers

Disclaimer: This article is written based on Windows 10 Tech Preview – Build 10041. Things might change completely in the future.

The Windows 10 Preview SDK was finally released, and we all finally get a peek at what the new Universal App Projects (UAP) are all about. It’s one binary that will run everywhere. This means that it’s also one XAML to run both on Windows and Windows Phone. But because the user experience is usually quite different you might want a different UI for it. So a new functionality was added to Visual State that allows you to easily change the layout based on the width of your window. So the idea is that the layout adapts not based on device, but by screen real-estate. Here’s what that could look like:

<Grid >
  <VisualStateManager.VisualStateGroups>
    <VisualStateGroup >
      <VisualState x:Name="narrow">
        <VisualState.StateTriggers>
          <AdaptiveTrigger MinWindowWidth="0" />
        </VisualState.StateTriggers>
        <VisualState.Setters>
          <Setter Target="status.Text" Value="Narrow view" />
        </VisualState.Setters>
      </VisualState>
      <VisualState x:Name="wide">
        <VisualState.StateTriggers>
          <AdaptiveTrigger MinWindowWidth="600" />
        </VisualState.StateTriggers>
        <VisualState.Setters>
          <Setter Target="status.Text" Value="Wide view" />
        </VisualState.Setters>
      </VisualState>
    </VisualStateGroup>
  </VisualStateManager.VisualStateGroups>
  
  <TextBlock x:Name="status" FontSize="40"
  HorizontalAlignment="Center" VerticalAlignment="Center" />
</Grid>
WideNarrowState

So the basic idea is that by using the AdaptiveTrigger, when the window gets small enough, switch to the phone/narrow UI. So on a phone it’ll probably always be this UI used. Pretty neat, and allows for a similar experience across devices, but adapt for bigger screens.

When taking a closer look at the StateTriggers property, it takes a collection of ‘StateTrigger’, which is an abstract class that AdaptiveTrigger inherits from. So it stands to reason that perhaps we can create our own state triggers?

Supposed basing your UI on the width isn’t good enough, and you want to base it on the platform you’re on (Windows vs Windows Phone), we can create a new state trigger for this purpose. All we have to do is call the base method SetTriggerValue(bool) whether the conditions of the state is enabled or not. So here’s what a class like that would look like:

public class DeviceTypeAdaptiveTrigger : StateTriggerBase
{
    public DeviceType PlatformType
    {
        get { return (DeviceTypeAdaptiveTrigger.DeviceType)GetValue(DeviceTypeProperty); }
        set { SetValue(DeviceTypeProperty, value); }
    }
 
    public static readonly DependencyProperty DeviceTypeProperty =
        DependencyProperty.Register("DeviceType", typeof(DeviceType), typeof(DeviceTypeAdaptiveTrigger),
        new PropertyMetadata(DeviceType.Unknown, OnDeviceTypePropertyChanged));
 
    private static void OnDeviceTypePropertyChanged(DependencyObject d, DependencyPropertyChangedEventArgs e)
    {
        var obj = (DeviceTypeAdaptiveTrigger)d;
        var val = (DeviceType)e.NewValue;
        var qualifiers = Windows.ApplicationModel.Resources.Core.ResourceContext.GetForCurrentView().QualifierValues;
        if (qualifiers.ContainsKey("DeviceFamily") && qualifiers["DeviceFamily"] == "Mobile")
            obj.SetTriggerValue(val == DeviceType.Mobile);
        if (qualifiers.ContainsKey("DeviceFamily") && qualifiers["DeviceFamily"] == "Desktop")
            obj.SetTriggerValue(val == DeviceType.Desktop);
    }
 
    public enum DeviceType
    {
        Unknown = 0, Desktop = 1, Mobile = 2,
    }
}

And we can use this in XAML this way:

<VisualStateGroup>
    <VisualState x:Name="windows">
        <VisualState.StateTriggers>
            <triggers:DeviceTypeAdaptiveTrigger DeviceType="Desktop" />
        </VisualState.StateTriggers>
        <VisualState.Setters>
            <Setter Target="greeting.Text" Value="Hello Windows!" />
        </VisualState.Setters>
    </VisualState>
    <VisualState x:Name="phone">
        <VisualState.StateTriggers>
            <triggers:DeviceTypeAdaptiveTrigger DeviceType="Mobile" />
        </VisualState.StateTriggers>
        <VisualState.Setters>
            <Setter Target="greeting.Text" Value="Hello Phone!" />
        </VisualState.Setters>
    </VisualState>
</VisualStateGroup>

image

I’ve created a few more triggers and put them on Github. I won’t go into the code here, but you can grab the source up there. But instead here’s how we can use some of these:

OrientationStateTrigger: Adapt the UI based on the screen orientation: Portrait or Landscape

<VisualStateGroup>
    <VisualState x:Name="landscape">
        <VisualState.StateTriggers>
            <triggers:OrientationStateTrigger Orientation="Landscape" />
        </VisualState.StateTriggers>
        <VisualState.Setters>
            <Setter Target="orientationText.Text" Value="Landscape!" />
        </VisualState.Setters>
    </VisualState>
    <VisualState x:Name="portrait">
        <VisualState.StateTriggers>
            <triggers:OrientationStateTrigger Orientation="Portrait" />
        </VisualState.StateTriggers>
        <VisualState.Setters>
            <Setter Target="orientationText.Text" Value="Portrait!" />
        </VisualState.Setters>
    </VisualState>
</VisualStateGroup>

IsTypePresentStateTrigger: Enabled/disable UI based on whether a certain API is available. For instance if a hardware back button is present (usually Windows Phone), we can hide the back button from the UI, and free up some screen space.

<VisualState x:Name="backButton">
    <VisualState.StateTriggers>
        <triggers:IsTypePresentStateTrigger TypeName="Windows.Phone.UI.Input.HardwareButtons" />
    </VisualState.StateTriggers>
    <VisualState.Setters>
        <Setter Target="BackButton.Visibility" Value="Collapsed" />
    </VisualState.Setters>
</VisualState>

Now the next question is: Does these values support binding? If they do, these triggers could be the new equivalent of WPF’s DataTriggers. So let’s create a simple data trigger that turns something on, based on a boolean. We can implement a simple IsTrueStateTrigger / IsFalseStateTrigger and just call the base method if the value we bound is true or not.

<VisualState>
    <VisualState.StateTriggers>
        <triggers:IsTrueStateTrigger Value="{Binding MyBoolean}" />
    </VisualState.StateTriggers>
    <VisualState.Setters>
        <Setter Target="box.Visibility" Value="Collapsed" />
    </VisualState.Setters>
</VisualState>

Of course I could use a value converter for this as well, but this has a lot greater flexibility – a converter would have to be written to convert to Visible/Collapsed state, whereas this trigger can set any property to any value type.

Got any more ideas for useful generic state triggers? Fork and make a pull request!

https://github.com/dotMorten/WindowsStateTriggers

Big props goes to Scott Lovegrove for directing my attention to the possibility of custom state triggers

Creating a simple push service for home automation alerts

In my intro post for my home automation project, I described a part of the app that sends temperature, humidity and power consumption measurements and pushes them to my phone. In this blogpost, we’ll build a simple console-webservice that allows a phone to register itself with the service, and the service can push a message to any registered device using the Windows Notification Service. Even if you’re not building a home automation server, but just need to figure out how to push a message to your phone or tablet, this blogpost is still for you (but you can ignore some of the console webservice bits).

To send a push message via WNS to an app, you need the “phone number of the app”. This is a combination of the app and the device ID. If you know this, and you’re the owner for the app, you are able to push messages to the app on the device. It’s only the app on the device that knows this phone number. If the app wants someone to push a message to the device, it will need go share it with that someone. But for this to work, you will first have to register the app on the Microsoft developer portal and associate your project with the app in order to be able to create a valid “phone number”.

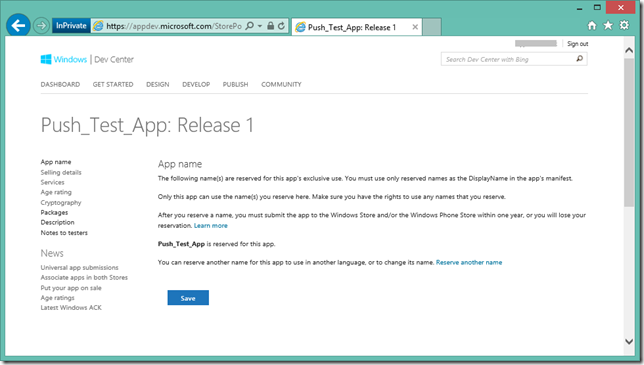
Here’s the website after registering my app “Push_Test_App”. You simply create a new app, and only need to complete step 1 to start using WNS.
image

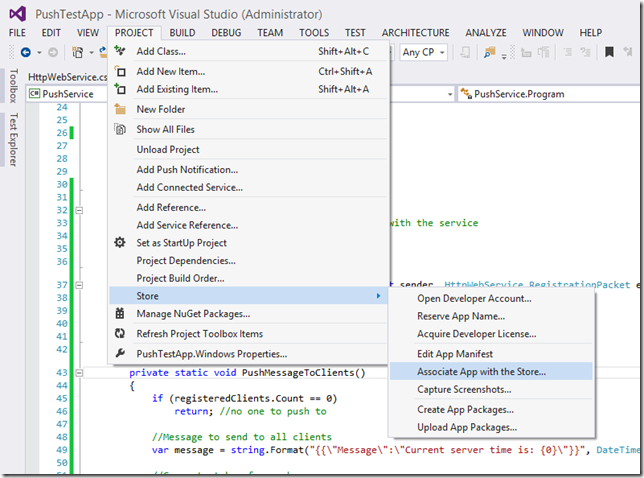
Next you will need to associate your app with the app you created in the store from the following menu item:
image

Simply follow the step-by-step guide. Note that the option is only available for the active startup-up project. Repeat this for both the store and phone app if you’re creating a universal project (make sure to change the startup project to get the menu item to relate to the correct project).

This is all we need to do to get the app’s “phone number”  the “channel uri”. We can get that using the following line of code:

var channel = await PushNotificationChannelManager.CreatePushNotificationChannelForApplicationAsync();
var uri = channel.Uri;

Notice that the channel.Uri property is just a URL. This is the URL to the WNS service where we can post stuff to. The WNS service will then forward the message you send to your app on the specific device.

Next step is to create a push service. We’ll create two operations: A webservice that an app can send the channel Uri to, and later an operation to push messages to all registered clients.

We’ll first build the simple console app webserver. Some of this is in part based http://codehosting.net/blog/BlogEngine/post/Simple-C-Web-Server.aspx where you can get more details.

The main part to notice is that we’ll start a server on port 8080, and we’ll wait for a call to /registerPush with a POST body containing a json object with channel uri and device id:

using System;
using System.Net;
using System.Runtime.Serialization;
using System.Runtime.Serialization.Json;
using System.Threading;

namespace PushService
{
    internal class HttpWebService
    {
        private HttpListener m_server;
        
        public void Start()
        {
            ThreadPool.QueueUserWorkItem((o) => RunServer());
        }

        private void RunServer()
        {
            Int32 port = 8080;
            m_server = new HttpListener();
            m_server.Prefixes.Add(string.Format("http://*:{0}/", port));
            m_server.Start();
            while (m_server.IsListening)
            {
                HttpListenerContext ctx = m_server.GetContext();
                ThreadPool.QueueUserWorkItem((object c) => ProcessRequest((HttpListenerContext)c), ctx);
            }
        }

        public void Stop()
        {
            if (m_server != null)
            {
                m_server.Stop();
                m_server.Close();
            }
        }

        private void ProcessRequest(HttpListenerContext context)
        {
            switch(context.Request.Url.AbsolutePath)
            {
                case "/registerPush":
                    HandlePushRegistration(context);
                    break;
                default:
                    context.Response.StatusCode = 404; //NOT FOUND
                    break;
            }
            context.Response.OutputStream.Close();
        }

        private void HandlePushRegistration(HttpListenerContext context)
        {
            if (context.Request.HttpMethod == "POST")
            {
                if (context.Request.HasEntityBody)
                {
                    System.IO.Stream body = context.Request.InputStream;
                    System.Text.Encoding encoding = context.Request.ContentEncoding;
                    System.IO.StreamReader reader = new System.IO.StreamReader(body, encoding);
                    DataContractJsonSerializer s = new DataContractJsonSerializer(typeof(RegistrationPacket));
                    var packet = s.ReadObject(reader.BaseStream) as RegistrationPacket;
                    if (packet != null && packet.deviceId != null && !string.IsNullOrWhiteSpace(packet.channelUri))
                    {
                        if (ClientRegistered != null)
                            ClientRegistered(this, packet);
                        context.Response.StatusCode = 200; //OK
                        return;
                    }
                }
            }
            context.Response.StatusCode = 500; //Server Error
        }

        /// <summary>
        /// Fired when a device registers itself
        /// </summary>
        public event EventHandler<RegistrationPacket> ClientRegistered;


        [DataContract]
        public class RegistrationPacket
        {
            [DataMember]
            public string channelUri { get; set; }
            [DataMember]
            public string deviceId { get; set; }
        }
    }
}

Next let’s start this service in the console main app. We’ll listen for clients registering and store them in a dictionary.


private static Dictionary<string, Uri> registeredClients = new Dictionary<string, Uri>(); //List of registered devices

static void Main(string[] args)
{
    //Start http service
    var svc = new HttpWebService();
    svc.Start();
    svc.ClientRegistered += svc_ClientRegistered;

    Console.WriteLine("Service started. Press CTRL-Q to quit.");
    while (true)
    {
        var key = Console.ReadKey();
        if (key.Key == ConsoleKey.Q && key.Modifiers == ConsoleModifiers.Control)
            break;
    }
    //shut down
    svc.Stop();
}
        
private static void svc_ClientRegistered(object sender, HttpWebService.RegistrationPacket e)
{
    if(registeredClients.ContainsKey(e.deviceId))
        Console.WriteLine("Client updated: " + e.deviceId);
    else
        Console.WriteLine("Client registered: " + e.deviceId);
    
    registeredClients[e.deviceId] = new Uri(e.channelUri); //store list of registered devices
}

Note: You will need to launch this console app as admin to be able to open the http port.

Next, let’s add some code to our phone/store app that calls the endpoint and sends its channel uri and device id (we won’t really need the device id, but it’s a nice way to identify the clients we have to push to and avoid duplicates). We’ll also add a bit of code to handle receiving a push notification if the server was to send a message back (we’ll get to the latter later):

private async void ButtonRegister_Click(object sender, RoutedEventArgs e)
{
    var channel = await PushNotificationChannelManager.CreatePushNotificationChannelForApplicationAsync();
    var uri = channel.Uri;
    channel.PushNotificationReceived += channel_PushNotificationReceived;
    RegisterWithServer(uri);
}

private async void RegisterWithServer(string uri)
{
    string IP = "192.168.1.17"; //IP address of server. Replace with the ip/servername where your service is running on
    HttpClient client = new HttpClient();

    DataContractJsonSerializer s = new DataContractJsonSerializer(typeof(RegistrationPacket));
    RegistrationPacket packet = new RegistrationPacket()
    {
        channelUri = uri,
        deviceId = GetHardwareId()
    };
    System.IO.MemoryStream ms = new System.IO.MemoryStream();
    s.WriteObject(ms, packet);
    ms.Seek(0, System.IO.SeekOrigin.Begin);
    try
    {
        //Send push channel to server
        var result = await client.PostAsync(new Uri("http://" + IP + ":8080/registerPush"), new StreamContent(ms));
        Status.Text = "Push registration successfull";
    }
    catch(System.Exception ex) {
        Status.Text = "Push registration failed: " + ex.Message;
    }
}

//returns a unique hardware id
private string GetHardwareId()
{
    var token = Windows.System.Profile.HardwareIdentification.GetPackageSpecificToken(null);
    var hardwareId = token.Id;
    var dataReader = Windows.Storage.Streams.DataReader.FromBuffer(hardwareId);

    byte[] bytes = new byte[hardwareId.Length];
    dataReader.ReadBytes(bytes);
    return BitConverter.ToString(bytes);
}

[DataContract]
public class RegistrationPacket
{
    [DataMember]
    public string channelUri { get; set; }
    [DataMember]
    public string deviceId { get; set; }
}

//Called if a push notification is sent while the app is running
private void channel_PushNotificationReceived(PushNotificationChannel sender, PushNotificationReceivedEventArgs args)
{
    var content = args.RawNotification.Content;
    var _ = Dispatcher.RunAsync(Windows.UI.Core.CoreDispatcherPriority.Normal, () =>
    {
        Status.Text = "Received: " + content; //Output message to a TextBlock
    });
}

Now if we run this app, we can register the device with you service. When you run both, you should see a “client registered” output in the console. If not, check your IP and firewall settings.

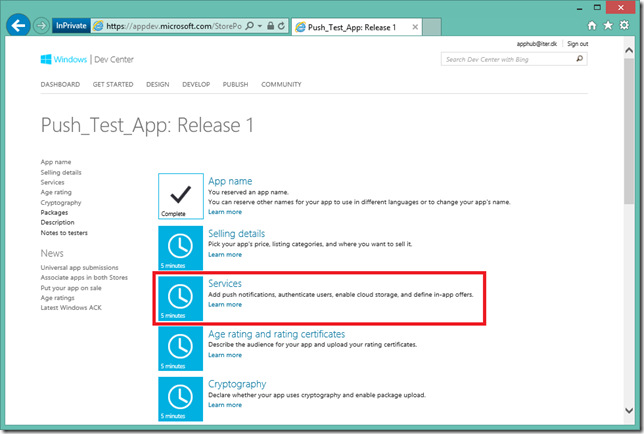
Lastly, we need to perform a push notification. The basics of it is to simply post some content to the url. However the service will need to authenticate itself using OAuth. To authenticate, we need to go back to the dev portal and go to the app we created. Click the “Services” option:
image

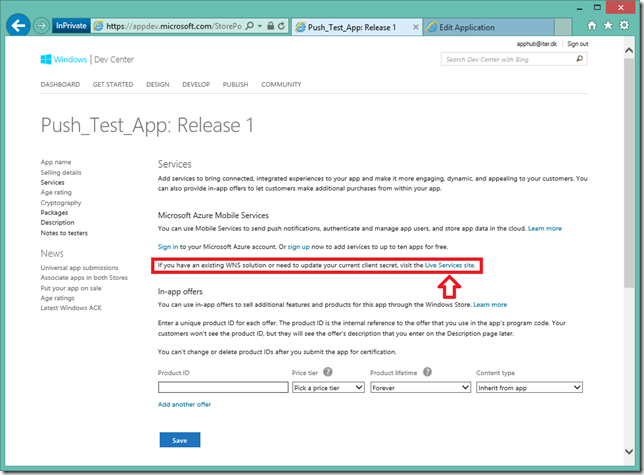
Next, go to the subtle link on the following page (this link isn’t very obvious, even though it’s the most important thing on this page):
image

The next page has what you need. Copy the highlighted Package SID + Client Secret on this page. You will need this to authenticate with the WNS service.
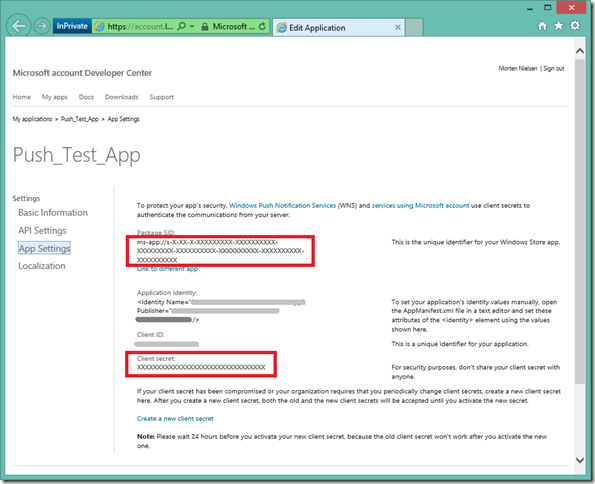
image

The following helper class creates an OAuth token using the above secret and client id, as well as provides a method for pushing a message to a channel uri using that token:

using System;
using System.IO;
using System.Net;
using System.Runtime.Serialization;
using System.Runtime.Serialization.Json;
using System.Text;
using System.Web;

namespace PushService
{
    internal static class PushHelper
    {
        public static void Push(Uri uri, OAuthToken accessToken, string message)
        {
            HttpWebRequest request = HttpWebRequest.Create(uri) as HttpWebRequest;
            request.Method = "POST";
            //Change this depending on the type of notification you need to do. Raw is just text
            string notificationType = "wns/raw";
            string contentType = "application/octet-stream";
            request.Headers.Add("X-WNS-Type", notificationType);
            request.ContentType = contentType;
            request.Headers.Add("Authorization", String.Format("Bearer {0}", accessToken.AccessToken));

            byte[] contentInBytes = Encoding.UTF8.GetBytes(message);
            using (Stream requestStream = request.GetRequestStream())
                requestStream.Write(contentInBytes, 0, contentInBytes.Length);
            try
            {
                using (HttpWebResponse webResponse = (HttpWebResponse)request.GetResponse())
                {
                    string code = webResponse.StatusCode.ToString();
                }
            }
            catch (Exception)
            {
                throw;
            }
        }

        public static OAuthToken GetAccessToken(string secret, string sid)
        {
            var urlEncodedSecret = HttpUtility.UrlEncode(secret);
            var urlEncodedSid = HttpUtility.UrlEncode(sid);

            var body =
              String.Format("grant_type=client_credentials&client_id={0}&client_secret={1}&scope=notify.windows.com", urlEncodedSid, urlEncodedSecret);

            string response;
            using (var client = new System.Net.WebClient())
            {
                client.Headers.Add("Content-Type", "application/x-www-form-urlencoded");
                response = client.UploadString("https://login.live.com/accesstoken.srf", body);
            }
            using (var ms = new MemoryStream(Encoding.Unicode.GetBytes(response)))
            {
                var ser = new DataContractJsonSerializer(typeof(OAuthToken));
                var oAuthToken = (OAuthToken)ser.ReadObject(ms);
                return oAuthToken;
            }
        }
    }

    [DataContract]
    internal class OAuthToken
    {
        [DataMember(Name = "access_token")]
        public string AccessToken { get; set; }
        [DataMember(Name = "token_type")]
        public string TokenType { get; set; }
    }
}

Next let’s change our console main method to include pushing a message to all registered clients when pressing ‘S’. In this simple sample we’ll just push the current server time.

static void Main(string[] args)
{
    //Start http service
    var svc = new HttpWebService();
    svc.Start();
    svc.ClientRegistered += svc_ClientRegistered;

    Console.WriteLine("Service started. Press CTRL-Q to quit.\nPress 'S' to push a message.");
    while (true)
    {
        var key = Console.ReadKey();
        if (key.Key == ConsoleKey.Q && key.Modifiers == ConsoleModifiers.Control)
            break;
        else if(key.Key == ConsoleKey.S)
        {
            Console.WriteLine();
            PushMessageToClients();
        }
    }
    //shut down
    svc.Stop();
}

private static void PushMessageToClients()
{
    if (registeredClients.Count == 0)
        return; //no one to push to

    //Message to send to all clients
    var message = string.Format("{{\"Message\":\"Current server time is: {0}\"}}", DateTime.Now);

    //Generate token for push

    //Set app package SID and client clientSecret (get these for your app from the developer portal)
    string packageSid = "ms-app://s-X-XX-X-XXXXXXXXX-XXXXXXXXXX-XXXXXXXXX-XXXXXXXXXX-XXXXXXXXXX-XXXXXXXXXX-XXXXXXXXXX";
    string clientSecret = "XXXXXXXXXXXXXXXXXXXXXXXXXXXXXXXX";
    //Generate oauth token required to push messages to client
    OAuthToken accessToken = null;
    try
    {
        accessToken = PushHelper.GetAccessToken(clientSecret, packageSid);
    }
    catch (Exception ex)
    {
        Console.WriteLine("ERROR: Failed to get access token for push : {0}", ex.Message);
        return;
    }

    int counter = 0;
    //Push the message to all the clients
    foreach(var client in registeredClients)
    {
        try
        {
            PushHelper.Push(client.Value, accessToken, message);
            counter++;
        }
        catch (Exception ex)
        {
            Console.WriteLine("ERROR: Failed to push to {0}: {1}", client.Key, ex.Message);
        }
    }
    Console.WriteLine("Pushed successfully to {0} client(s)", counter);
}

Now run the console app and the phone/store app. First click the “register” button in your app, then in the console app click “S” to send a message. Almost instantly you should see the server time printed inside your app.

image


Note: We’re not using a background task, so this will only work while the app is running. In the next blogpost we’ll look at how to set this up, as well as how to create a live tile with a graph on it.

You can download all the source code here: Download (Remember to update the Packet SID/Client Secret and associate the app with your own store app).

Fixing Visual Studio’s auto generated code

I usually have a zero-tolerance when it comes to build warnings. While granted often the warnings are benign, having a lot will very often hide the important ones. Sometimes I even set the option “treat warnings as errors” to help me enforce this. When you’re building a library, you should also add XML doc comments to your classes and members, so you get full intellisense support in the projects you’re using it from. Just remember to check off the following check box:

image

This also have the benefit of giving you warnings for missing doc comments on public members, so you remember to write proper doc. However if you’re building for Windows Store or Phone, there’s a good chance you’ll see these four warnings now:

image

These are coming from code auto-generated by the compiler which exposes a set of public classes. You can even see these in intellisense:

image

This is a major issue in my mind. First of all it introduces warnings in code you didn’t write, and it pollutes your class library with methods that are not meant to be used. Here’s what this auto-generated class looks like:

image

The fix seems simple: Just go in and add the doc comments, and problem is solved, right? Not really. The problem is any changes you make to this file is overwritten every time you build. So we need to tweak the file right after it’s being generated, but right before it’s being compiled, but who’s that fast?

Enter: The Build Task

We can use a build task to do exactly that, and tell Visual Studio to let us know that its about to compile the code and fix it ourselves.

First create a new empty Windows Class Library, and add the following two references:

image

Next add the following class and compile:

XamlTypeInfoBuildTask.cs

using Microsoft.Build.Framework;
using Microsoft.Build.Utilities;
using System;

namespace XamlBuildTasks
{
    public class XamlTypeInfoBuildTask : Task
    {
        private const string XamlTypeInfoFileName = "XamlTypeInfo.g.cs";

        [Required]
        public string IntermediateOutputPath { get; set; }       
       
        public override bool Execute()
        {
            string filename = IntermediateOutputPath + XamlTypeInfoFileName;
            if (!System.IO.File.Exists(filename))
                return false;
            string code = System.IO.File.ReadAllText(filename);

            if (code.StartsWith("#pragma warning disable 1591")) //Already modified
                return true;
            int idx = code.IndexOf("[System.CodeDom.Compiler.GeneratedCodeAttribute");
            if (idx < 0)
                return false;
            string insert = "[System.ComponentModel.EditorBrowsable(System.ComponentModel.EditorBrowsableState.Never)]\n";
            code = "#pragma warning disable 1591\n" + code.Substring(0, idx) + insert + code.Substring(idx) +
                "#pragma warning restore 1591\n";
            System.IO.File.WriteAllText(filename, code);
            return true;
        }
    }
}

What does this class do? Simple: It has one property: The folder where the intermediate files including XamlTypeInfo.g.cs is. It then opens the file to be modified, and first injects “#pragma warning disable 1591” at the header which disables doc warnings, and re-enables it again at the bottom. At the same time we hide the class from intellisense, by setting the EditorBrowsable attribute on the class. This doesn’t really remove the class from the assembly – it just tells Visual Studio to skip showing this for intellisense.

To use this build-task, we need to add a little bit to the project file that causes this issue. We’ll first create a .targets file with the parameters for buildtask. Place this next to the compiled DLL (and use the name of the dll where highlighted):

XamlTypeInfoBuildTask.targets

<Project xmlns="http://schemas.microsoft.com/developer/msbuild/2003">
  <UsingTask TaskName="XamlTypeInfoBuildTask"
            AssemblyFile="$(MSBuildThisFileDirectory)XamlBuildTask.dll" />
  <Target Name="MyBuildTask" AfterTargets="MarkupCompilePass2" BeforeTargets="CoreCompile">
    <XamlTypeInfoBuildTask IntermediateOutputPath="$(IntermediateOutputPath)" />
  </Target>
</Project>

This tells the project to run this before the compilation after the markup has been processed. It also sets the IntermediateOutputPath property on our build task, so the build task can find the file.

Now the last step is to reference this .targets file from the csproj file. Open the csproj file up in notepad, and scroll down to the <Import…/> tags, and add the following (remember to modify the highlighted paths to where the targets file is:

  <Import Project="..\..\..\build\XamlTypeInfoBuildTask.targets" Condition="Exists('..\..\..\build\XamlTypeInfoBuildTask.targets')" />

Now when we build, we get a nice pretty build with no warnings:

image

And here’s all the auto-generated classes, gone from intellisense:

image

Making all this simpler

Naturally this is a bit of a pain having to set up over and over again. So unless you ever have to do a similar build task, you can forget everything you just read (sorry Smile), and just use the Nuget package I created that’ll do all this for you.

Simply add a reference to this nuget package, and the build task dll is downloaded and the .targets file auto-referenced.

And if you want the source code? It’s all available here on Github: https://github.com/dotMorten/XamlTypeInfoBuildTask

Enjoy!

Create Universal Map App In Under 2 Minutes

We just released the second beta drop of the 'ArcGIS Runtime for .NET SDK', which now supports both Windows Store 8.1, Windows Phone 8.1 in addition to WPF. This means you can now build universal apps with a map control that supports all these platforms. We also released the package on NuGet for your convenience.

As a demonstration how quick it is to create a Windows Phone and Windows Store app, here's a little video creating a universal map app from scratch in 80 seconds:


Note: The nuget package currently doesn't support WPF. You will need to download the full setup to get WPF support as well, instead of using the nuget version.