In my intro post for my home automation project, I described a part of the app that sends temperature, humidity and power consumption measurements and pushes them to my phone. In this blogpost, we’ll build a simple console-webservice that allows a phone to register itself with the service, and the service can push a message to any registered device using the Windows Notification Service. Even if you’re not building a home automation server, but just need to figure out how to push a message to your phone or tablet, this blogpost is still for you (but you can ignore some of the console webservice bits).
To send a push message via WNS to an app, you need the “phone number of the app”. This is a combination of the app and the device ID. If you know this, and you’re the owner for the app, you are able to push messages to the app on the device. It’s only the app on the device that knows this phone number. If the app wants someone to push a message to the device, it will need go share it with that someone. But for this to work, you will first have to register the app on the Microsoft developer portal and associate your project with the app in order to be able to create a valid “phone number”.
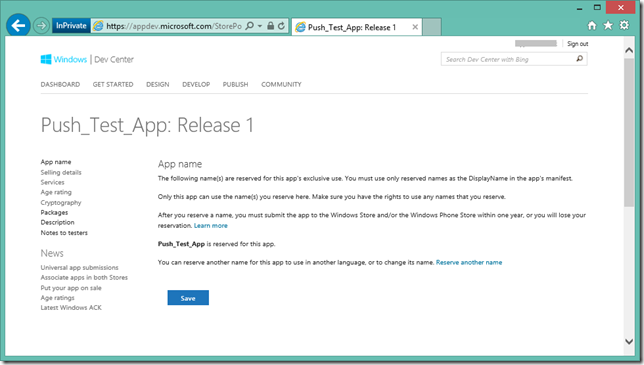
Here’s the website after registering my app “Push_Test_App”. You simply create a new app, and only need to complete step 1 to start using WNS.
Next you will need to associate your app with the app you created in the store from the following menu item:
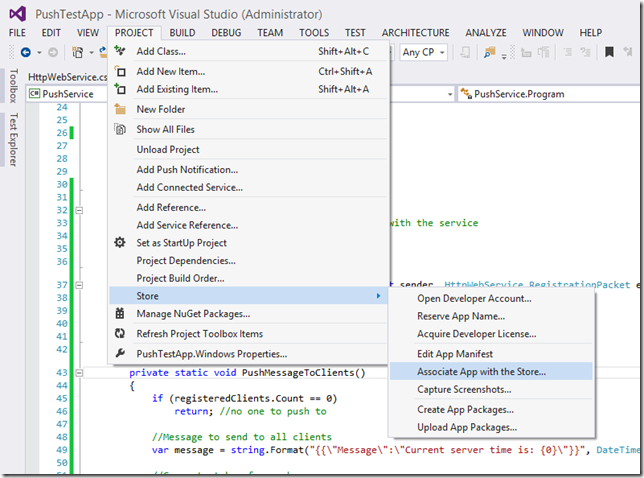
Simply follow the step-by-step guide. Note that the option is only available for the active startup-up project. Repeat this for both the store and phone app if you’re creating a universal project (make sure to change the startup project to get the menu item to relate to the correct project).
This is all we need to do to get the app’s “phone number” the “channel uri”. We can get that using the following line of code:
var channel = await PushNotificationChannelManager.CreatePushNotificationChannelForApplicationAsync();
var uri = channel.Uri;
Notice that the channel.Uri property is just a URL. This is the URL to the WNS service where we can post stuff to. The WNS service will then forward the message you send to your app on the specific device.
Next step is to create a push service. We’ll create two operations: A webservice that an app can send the channel Uri to, and later an operation to push messages to all registered clients.
We’ll first build the simple console app webserver. Some of this is in part based http://codehosting.net/blog/BlogEngine/post/Simple-C-Web-Server.aspx where you can get more details.
The main part to notice is that we’ll start a server on port 8080, and we’ll wait for a call to /registerPush with a POST body containing a json object with channel uri and device id:
using System;
using System.Net;
using System.Runtime.Serialization;
using System.Runtime.Serialization.Json;
using System.Threading;

namespace PushService
{
    internal class HttpWebService
    {
        private HttpListener m_server;

        public void Start()
        {
            ThreadPool.QueueUserWorkItem((o) => RunServer());
        }

        private void RunServer()
        {
            Int32 port = 8080;
            m_server = new HttpListener();
            m_server.Prefixes.Add(string.Format("http://*:{0}/", port));
            m_server.Start();
            while (m_server.IsListening)
            {
                HttpListenerContext ctx = m_server.GetContext();
                ThreadPool.QueueUserWorkItem((object c) => ProcessRequest((HttpListenerContext)c), ctx);
            }
        }

        public void Stop()
        {
            if (m_server != null)
            {
                m_server.Stop();
                m_server.Close();
            }
        }

        private void ProcessRequest(HttpListenerContext context)
        {
            switch(context.Request.Url.AbsolutePath)
            {
                case "/registerPush":
                    HandlePushRegistration(context);
                    break;
                default:
                    context.Response.StatusCode = 404; //NOT FOUND
                    break;
            }
            context.Response.OutputStream.Close();
        }

        private void HandlePushRegistration(HttpListenerContext context)
        {
            if (context.Request.HttpMethod == "POST")
            {
                if (context.Request.HasEntityBody)
                {
                    System.IO.Stream body = context.Request.InputStream;
                    System.Text.Encoding encoding = context.Request.ContentEncoding;
                    System.IO.StreamReader reader = new System.IO.StreamReader(body, encoding);
                    DataContractJsonSerializer s = new DataContractJsonSerializer(typeof(RegistrationPacket));
                    var packet = s.ReadObject(reader.BaseStream) as RegistrationPacket;
                    if (packet != null && packet.deviceId != null && !string.IsNullOrWhiteSpace(packet.channelUri))
                    {
                        if (ClientRegistered != null)
                            ClientRegistered(this, packet);
                        context.Response.StatusCode = 200; //OK
                        return;
                    }
                }
            }
            context.Response.StatusCode = 500; //Server Error
        }

        /// <summary>
        /// Fired when a device registers itself
        /// </summary>
        public event EventHandler<RegistrationPacket> ClientRegistered;


        [DataContract]
        public class RegistrationPacket
        {
            [DataMember]
            public string channelUri { get; set; }
            [DataMember]
            public string deviceId { get; set; }
        }
    }
}
Next let’s start this service in the console main app. We’ll listen for clients registering and store them in a dictionary.
private static Dictionary<string, Uri> registeredClients = new Dictionary<string, Uri>(); //List of registered devices

static void Main(string[] args)
{
    //Start http service
    var svc = new HttpWebService();
    svc.Start();
    svc.ClientRegistered += svc_ClientRegistered;

    Console.WriteLine("Service started. Press CTRL-Q to quit.");
    while (true)
    {
        var key = Console.ReadKey();
        if (key.Key == ConsoleKey.Q && key.Modifiers == ConsoleModifiers.Control)
            break;
    }
    //shut down
    svc.Stop();
}

private static void svc_ClientRegistered(object sender, HttpWebService.RegistrationPacket e)
{
    if(registeredClients.ContainsKey(e.deviceId))
        Console.WriteLine("Client updated: " + e.deviceId);
    else
        Console.WriteLine("Client registered: " + e.deviceId);

    registeredClients[e.deviceId] = new Uri(e.channelUri); //store list of registered devices
}
Note: You will need to launch this console app as admin to be able to open the http port.
Next, let’s add some code to our phone/store app that calls the endpoint and sends its channel uri and device id (we won’t really need the device id, but it’s a nice way to identify the clients we have to push to and avoid duplicates). We’ll also add a bit of code to handle receiving a push notification if the server was to send a message back (we’ll get to the latter later):
private async void ButtonRegister_Click(object sender, RoutedEventArgs e)
{
    var channel = await PushNotificationChannelManager.CreatePushNotificationChannelForApplicationAsync();
    var uri = channel.Uri;
    channel.PushNotificationReceived += channel_PushNotificationReceived;
    RegisterWithServer(uri);
}

private async void RegisterWithServer(string uri)
{
    string IP = "192.168.1.17"; //IP address of server. Replace with the ip/servername where your service is running on
    HttpClient client = new HttpClient();

    DataContractJsonSerializer s = new DataContractJsonSerializer(typeof(RegistrationPacket));
    RegistrationPacket packet = new RegistrationPacket()
    {
        channelUri = uri,
        deviceId = GetHardwareId()
    };
    System.IO.MemoryStream ms = new System.IO.MemoryStream();
    s.WriteObject(ms, packet);
    ms.Seek(0, System.IO.SeekOrigin.Begin);
    try
    {
        //Send push channel to server
        var result = await client.PostAsync(new Uri("http://" + IP + ":8080/registerPush"), new StreamContent(ms));
        Status.Text = "Push registration successfull";
    }
    catch(System.Exception ex) {
        Status.Text = "Push registration failed: " + ex.Message;
    }
}

//returns a unique hardware id
private string GetHardwareId()
{
    var token = Windows.System.Profile.HardwareIdentification.GetPackageSpecificToken(null);
    var hardwareId = token.Id;
    var dataReader = Windows.Storage.Streams.DataReader.FromBuffer(hardwareId);

    byte[] bytes = new byte[hardwareId.Length];
    dataReader.ReadBytes(bytes);
    return BitConverter.ToString(bytes);
}

[DataContract]
public class RegistrationPacket
{
    [DataMember]
    public string channelUri { get; set; }
    [DataMember]
    public string deviceId { get; set; }
}

//Called if a push notification is sent while the app is running
private void channel_PushNotificationReceived(PushNotificationChannel sender, PushNotificationReceivedEventArgs args)
{
    var content = args.RawNotification.Content;
    var _ = Dispatcher.RunAsync(Windows.UI.Core.CoreDispatcherPriority.Normal, () =>
    {
        Status.Text = "Received: " + content; //Output message to a TextBlock
    });
}
Now if we run this app, we can register the device with you service. When you run both, you should see a “client registered” output in the console. If not, check your IP and firewall settings.
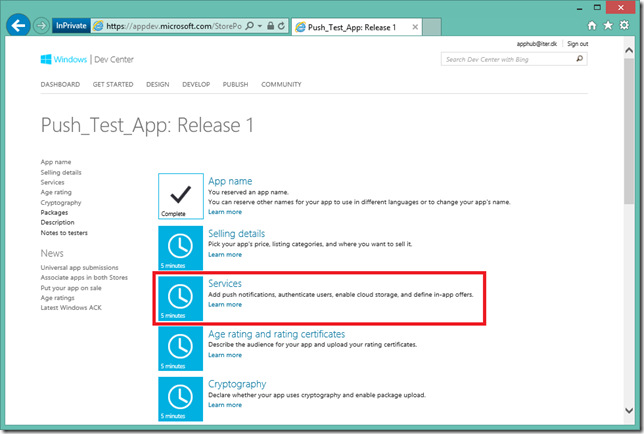
Lastly, we need to perform a push notification. The basics of it is to simply post some content to the url. However the service will need to authenticate itself using OAuth. To authenticate, we need to go back to the dev portal and go to the app we created. Click the “Services” option:
Next, go to the subtle link on the following page (this link isn’t very obvious, even though it’s the most important thing on this page):
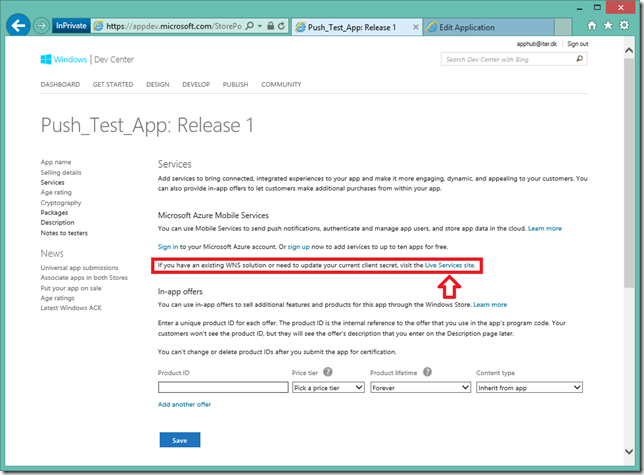
The next page has what you need. Copy the highlighted Package SID + Client Secret on this page. You will need this to authenticate with the WNS service.
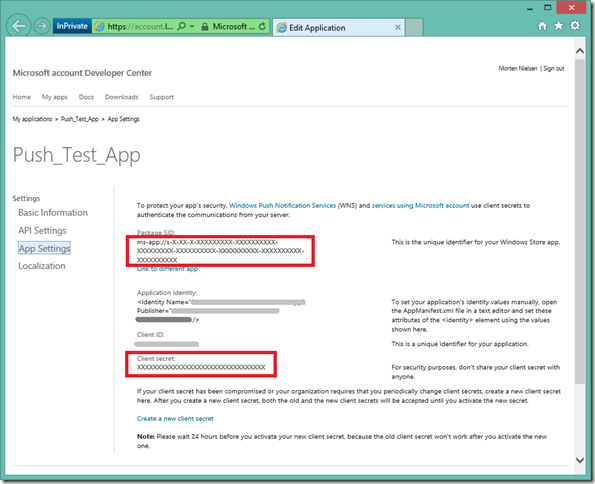
The following helper class creates an OAuth token using the above secret and client id, as well as provides a method for pushing a message to a channel uri using that token:
using System;
using System.IO;
using System.Net;
using System.Runtime.Serialization;
using System.Runtime.Serialization.Json;
using System.Text;
using System.Web;

namespace PushService
{
    internal static class PushHelper
    {
        public static void Push(Uri uri, OAuthToken accessToken, string message)
        {
            HttpWebRequest request = HttpWebRequest.Create(uri) as HttpWebRequest;
            request.Method = "POST";
            //Change this depending on the type of notification you need to do. Raw is just text
            string notificationType = "wns/raw";
            string contentType = "application/octet-stream";
            request.Headers.Add("X-WNS-Type", notificationType);
            request.ContentType = contentType;
            request.Headers.Add("Authorization", String.Format("Bearer {0}", accessToken.AccessToken));

            byte[] contentInBytes = Encoding.UTF8.GetBytes(message);
            using (Stream requestStream = request.GetRequestStream())
                requestStream.Write(contentInBytes, 0, contentInBytes.Length);
            try
            {
                using (HttpWebResponse webResponse = (HttpWebResponse)request.GetResponse())
                {
                    string code = webResponse.StatusCode.ToString();
                }
            }
            catch (Exception)
            {
                throw;
            }
        }

        public static OAuthToken GetAccessToken(string secret, string sid)
        {
            var urlEncodedSecret = HttpUtility.UrlEncode(secret);
            var urlEncodedSid = HttpUtility.UrlEncode(sid);

            var body =
              String.Format("grant_type=client_credentials&client_id={0}&client_secret={1}&scope=notify.windows.com", urlEncodedSid, urlEncodedSecret);

            string response;
            using (var client = new System.Net.WebClient())
            {
                client.Headers.Add("Content-Type", "application/x-www-form-urlencoded");
                response = client.UploadString("https://login.live.com/accesstoken.srf", body);
            }
            using (var ms = new MemoryStream(Encoding.Unicode.GetBytes(response)))
            {
                var ser = new DataContractJsonSerializer(typeof(OAuthToken));
                var oAuthToken = (OAuthToken)ser.ReadObject(ms);
                return oAuthToken;
            }
        }
    }

    [DataContract]
    internal class OAuthToken
    {
        [DataMember(Name = "access_token")]
        public string AccessToken { get; set; }
        [DataMember(Name = "token_type")]
        public string TokenType { get; set; }
    }
}
Next let’s change our console main method to include pushing a message to all registered clients when pressing ‘S’. In this simple sample we’ll just push the current server time.
static void Main(string[] args)
{
    //Start http service
    var svc = new HttpWebService();
    svc.Start();
    svc.ClientRegistered += svc_ClientRegistered;

    Console.WriteLine("Service started. Press CTRL-Q to quit.\nPress 'S' to push a message.");
    while (true)
    {
        var key = Console.ReadKey();
        if (key.Key == ConsoleKey.Q && key.Modifiers == ConsoleModifiers.Control)
            break;
        else if(key.Key == ConsoleKey.S)
        {
            Console.WriteLine();
            PushMessageToClients();
        }
    }
    //shut down
    svc.Stop();
}

private static void PushMessageToClients()
{
    if (registeredClients.Count == 0)
        return; //no one to push to

    //Message to send to all clients
    var message = string.Format("{{\"Message\":\"Current server time is: {0}\"}}", DateTime.Now);

    //Generate token for push

    //Set app package SID and client clientSecret (get these for your app from the developer portal)
    string packageSid = "ms-app://s-X-XX-X-XXXXXXXXX-XXXXXXXXXX-XXXXXXXXX-XXXXXXXXXX-XXXXXXXXXX-XXXXXXXXXX-XXXXXXXXXX";
    string clientSecret = "XXXXXXXXXXXXXXXXXXXXXXXXXXXXXXXX";
    //Generate oauth token required to push messages to client
    OAuthToken accessToken = null;
    try
    {
        accessToken = PushHelper.GetAccessToken(clientSecret, packageSid);
    }
    catch (Exception ex)
    {
        Console.WriteLine("ERROR: Failed to get access token for push : {0}", ex.Message);
        return;
    }

    int counter = 0;
    //Push the message to all the clients
    foreach(var client in registeredClients)
    {
        try
        {
            PushHelper.Push(client.Value, accessToken, message);
            counter++;
        }
        catch (Exception ex)
        {
            Console.WriteLine("ERROR: Failed to push to {0}: {1}", client.Key, ex.Message);
        }
    }
    Console.WriteLine("Pushed successfully to {0} client(s)", counter);
}
Now run the console app and the phone/store app. First click the “register” button in your app, then in the console app click “S” to send a message. Almost instantly you should see the server time printed inside your app.

Note: We’re not using a background task, so this will only work while the app is running. In the next blogpost we’ll look at how to set this up, as well as how to create a live tile with a graph on it.
You can download all the source code here: Download (Remember to update the Packet SID/Client Secret and associate the app with your own store app).