See intro blogpost here.
I often use System.Diagnostics.Debug.WriteLine to write out values or warnings that I or the developer should be aware of, but not necessarily is an error. However, Silverlight has an overload WPF doesn't have (hey I thought Silverlight was only a subset of WPF?!? - well... if it were we didn't need this blogpost serie).
Here are the overloads in Silverlight:
    public static void WriteLine(object value);
    public static void WriteLine(string message);
    public static void WriteLine(string format, params object[] args); //NOT IN WPF!
and WPF:
    public static void WriteLine(object value);
    public static void WriteLine(string message);
    public static void WriteLine(object value, string category);
    public static void WriteLine(string message, string category);
Notice that the 3rd method in Silverlight which is equivalent of using string.Format, doesn’t exist in WPF. Therefore it's safer to use WriteLine(string.Format(format,args)) instead which works in both.
Next: WPF vs. Silverlight - Part 7 - Case sensitivity
See intro blogpost here.
Take a look at the following XAML:
    <UserControl Loaded="UserControl_Loaded">
        <my:MyControl Loaded="MyControl_Loaded" />
    </UserControl>
Can you guess in what order the following events and methods will be triggered when the XAML loads:
- UserControl.Constructor
- MyControl.Constructor
- UserControl.Loaded event
- MyControl.Loaded event
- MyControl.OnApplyTemplate method
Come on... just guess...
The gotcha here is that it will be different for Silverlight and WPF!
| Silverlight |
WPF |
| UserControl.Constructor |
UserControl.Constructor |
| MyControl.Constructor |
MyControl.Constructor |
| MyControl.Loaded event |
MyControl.OnApplyTemplate method |
| UserControl.Loaded event |
UserControl.Loaded event |
| MyControl.OnApplyTemplate method |
MyControl.Loaded event |
Notice how OnApplyTemplate for the custom control fires before the Loaded events in WPF whereas in Silverlight if fires after. Therefore if you have code in OnApplyTemplate)() that relies on the the Loaded event having fired first, this probably won't work in WPF (nevermind the fact that your code is probably poorly designed if that's the case :-). Also note that the order the two loaded events fires are opposite.
This is also documented on MSDN:
“The timing of the Loaded event in Silverlight differs from the timing of the FrameworkElement.Loaded event in WPF. Specifically, the WPF Loaded event occurs after the template is applied. In Silverlight, the Loaded event is not guaranteed to occur after the template is applied”
A workaround for this is also suggested here: http://pagebrooks.com/archive/2008/11/30/tweaking-onapplytemplate-event-timing-in-silverlight-2.aspx
Next: WPF vs. Silverlight - Part 6 - Debug.WriteLine
See intro blogpost here.
If you want to work with animations programmatically, and modify them as they run, WPF requires you to start and stop the animation with a few extra parameters, to prevent them from being "frozen". Silverlight doesn't freeze elements, so this is not necessary there.
#if SILVERLIGHT
    myStoryboard.Begin();
    myStoryboard.Stop();
#else
    myStoryboard.Begin(element, true); //true allows for changing animation later
     myStoryboard.Stop(element); //element parameter required when Begin was called with element
#endif
Next: WPF vs. Silverlight - Part 5 - XAML Control Instantiation
See intro blogpost here.
WPF Requires you to call BeginInit and EndInit before and after setting the source. Also the load failed handlers are different.
BitmapImage bmi = new BitmapImage();
#if !SILVERLIGHT
bmi.BeginInit();
#endif
Image img = new Image();
bmi.UriSource = new Uri(strUrl, UriKind.Absolute);
#if SILVERLIGHT
img.ImageFailed += img_ImageFailed;
#else
bmi.DownloadFailed += bmi_DownloadFailed;
bmi.EndInit();
#endif
Image myImage = new Image();
myImage.Source = bmi;
Next: WPF vs. Silverlight - Part 4 - Animations
See intro blogpost here.
XamlReader has different overloads in WPF and Silverlight. Silverlight takes a string. WPF takes a stream to a string.
    UIElement element;
#if SILVERLIGHT
    element = XamlReader.Load(xaml);
#else
    using (MemoryStream xamlStream =
        new MemoryStream(UTF8Encoding.Default.GetBytes(xaml)))
        element = XamlReader.Load(xamlStream);
#endif
Next: WPF vs. Silverlight - Part 3 - Creating Bitmaps Programmatically
See intro blogpost here.
When applying default theme and template to custom controls that you declared in "/Themes/Generic.xaml" it's done differently in Silverlight and WPF:
public class MyControl : Control
{
    public MyControl()
    {
#if SILVERLIGHT
        this.DefaultStyleKey = typeof(MyControl);
#endif
    }
    static MyControl() {
#if !SILVERLIGHT
        DefaultStyleKeyProperty.OverrideMetadata(
            typeof(HoverControl),
            new FrameworkPropertyMetadata(
            typeof(HoverControl)));
#endif
    }
}
Also, in the WPF Assembly, you need to register the theme file in AssemblyInfo.cs This is done with the following line of code:
[assembly: ThemeInfo(ResourceDictionaryLocation.None,ResourceDictionaryLocation.SourceAssembly)]
Note: This code is usually added automatically when you create a new WPF project.
Next: WPF vs. Silverlight - Part 2 - XamlReader
In my day to day work, I work on building not one, not two, but three .NET API's. One for Silverlight, one for WPF, and one for Windows Phone. However, since this is all based on the same technology (.NET and XAML), we reuse most of our code for all 3 (a rough estimate is 99% is the same code files). That's pretty cool, because I can create one feature in for instance Silverlight, and WPF and Windows Phone will instantly have it.
...well except if I hit one of those inconsistencies that makes up the remaining 1% of code differences. I've searched through our code and looked for the most common code differences in the API's, and the following series will cover these.
When you do need to write platform specific code, you can use a compiler conditional to do it. By default a Silverlight project will have a "SILVERLIGHT" conditional declared that you can use to exclude or include code for a specific platform. This is done by surrounding the code with a #if [condition] ... #endif section. Example:
#if SILVERLIGHT
   //Silverlight and Windows Phone
#else
   //WPF
#endif
If you are writing code for Windows Phone as well, note that this is also a Silverlight app, and will compile with the SILVERLIGHT conditional. However, Windows Phone also has a default conditional you can use to exclude/include features separate from Windows Phone:
//Windows phone:
#if WINDOWS_PHONE
    //Windows Phone
#endif
or
#if !SILVERLIGHT || WINDOWS_PHONE
    //Windows Phone and WPF
#endif
or
#if SILVERLIGHT && !WINDOWS_PHONE
    //Silverlight but NOT Windows Phone
#endif
You will see these conditionals used in the upcoming blogposts to separate the code differences between the platforms. Click to select a topic below:
- WPF vs. Silverlight - Part 1 - Custom Controls Theme
- WPF vs. Silverlight - Part 2 – XamlReader
- WPF vs. Silverlight - Part 3 - Creating Bitmaps Programmatically
- WPF vs. Silverlight - Part 4 – Animations
- WPF vs. Silverlight - Part 5 - XAML Control Instantiation
- WPF vs. Silverlight - Part 6 - Debug.WriteLine
- WPF vs. Silverlight - Part 7 - Case sensitivity
- WPF vs. Silverlight - Part 8 - Reusing code in Visual Studio #1
- WPF vs. Silverlight - Part 9 - Reusing code in Visual Studio #2
- WPF vs. Silverlight - Part 10 - XAML Parser Differences
- WPF vs. Silverlight - Part 11 - Silverlight on Phone vs. Browser
- More to come… keep checking back…
Enjoy!
---
A note on our development approach: We generally build a new feature for Silverlight first. Since Silverlight is a subset of WPF, we are less likely to be using an API that's not available in WPF (since it has most of what Silverlight has). We then test the code in WPF and tweak if necessary (tweaks rarely needed). Windows Phone is Silverlight (albeit roughly an earlier version), so we might exclude a feature here and there, but generally the only differences here are various simplifications for performance reasons (most of which isn’t needed with the upcoming Mango release), and of course sometimes retemplating for a smaller touch-centric screen.
Tomorrow, I’ll be doing a presentation on .NET code reuse across Silverlight, WPF and Windows Phone at the LA SLUG user group meeting.
Microsoft has been touting for a while that you can reuse your code across these platforms, but never really tell you about all the gotcha’s. As part of my day job building the ArcGIS API for Silverlight, WPF and Windows Phone (where 99% of the code is reused), I’ll talk about the experiences and lessons learned, and what usually hides in the remaining 1%.
The meetup will take place:
Wednesday, May 25, 2011 at 7:00 PM (PDT)
United Future / Wongdoody
8500 Steller Dr Culver City, CA
If you are not in the LA Area, you will miss out on the free beer and pizza, but for the first time ever LA SLUG will be streaming the event online. See event details for more info. I’ll post slides (and if there is a recording, a link to that as well) shortly after.

Silverlight or WPF? Who will win? Or will they team up to be the best tigerblood-powered kick-ass platform ever conceived?
There has been quite a few blog posts on how to create custom cursors in Silverlight, but I felt some of them were very limited or not very re-useable, or required you to put the cursor in the layout and put restrictions on your layout (like for instance requiring you to use a Canvas as parent for your cursor). So I ended up writing my own class for it that doesn’t have any of these restrictions.
The basic idea is the same as other approaches out there: You “disable” the cursor on your element by setting myElement.Cursor = Cursors.None. Next you move a custom UIElement around on top of your layout which represents your custom cursor. My approach uses a Popup, and therefore never requires you to modify your layout, and you can easily change the cursor on the fly. The cursor look is defined using a DataTemplate and can contain animations and so on.
All you need to do is define a DataTemplate and use the Attached Property to define the template. Below is an example of this working on a border element:
<UserControl x:Class="CustomCursor.MainPage"
   xmlns="http://schemas.microsoft.com/winfx/2006/xaml/presentation"
   xmlns:x="http://schemas.microsoft.com/winfx/2006/xaml"
   xmlns:local="clr-namespace:SharpGIS.CustomCursor">
   <UserControl.Resources>
        <DataTemplate x:Key="CircleCursor">
            <Ellipse Fill="Red" Width="20" Height="20" />
        </DataTemplate>
   </UserControl.Resources>
   <Grid>
       <Border Background="Blue"
           local:CustomCursor.CursorTemplate="{StaticResource CircleCursor}" />
   </Grid>
</UserControl>
And that’s all there is to it!
If you need to customize where the centering of the element is, simply apply a TranslateTranform to the element. Ie. if you want the above circle to center on the mouse location, add a TranslateTransform of –10,-10 to the ellipse.
Downloads:
Update: Someone awesome ported this to Windows Store apps as well! Go download here: http://customcursor.codeplex.com/
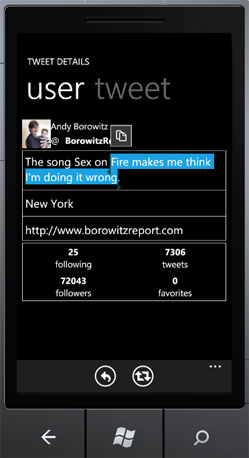
With the recent update of Windows Phone 7, AKA the "NoDo" update, Windows Phone got support for Copy/Paste. Any existing app out there instantly gets this support automatically, without the developer has to do anything.
However, copy/paste only works on TextBoxes, but what if you want to allow the user to copy text from a TextBlock? Today this is not possible. The trick to make this work is to simply use a readonly TextBox, and restyle it to look like a TextBlock. Here's the TextBox style that accomplishes this:
<Style x:Key="ReadOnlyTextBox" TargetType="TextBox">
	<Setter Property="Foreground" Value="{StaticResource PhoneForegroundBrush}" />
	<Setter Property="IsReadOnly" Value="True" />
	<Setter Property="TextWrapping" Value="Wrap" />
	<Setter Property="Template">
		<Setter.Value>
			<ControlTemplate>
				<Grid>
					<ContentPresenter x:Name="ContentElement" />
				</Grid>
			</ControlTemplate>
		</Setter.Value>
	</Setter>
</Style>
Note: This approach actually also applies to "normal" browser-Silverlight as well.
